After 4 decades of IT Management, Development, & Consulting, here’s a complete, successful set of all LiteSpeed Cache Plugin Settings I use on my sites. AND, I no longer need a hosted LiteSpeed Server! I learned how to achieve typically 93-100 on all 4 PSI metrics, even with 18-20 plugins. See all screens and all my settings of all tabs. Tap here to jump to the first settings section.
Read my tips and other experts’ tips on which items to customize for your standard sites, sites with advertising, “WP Recipe Maker” sites, and handling conflicts. See other related topics in my recommended WordPress plugins category.
Finally, this post stays current because I actually use this article as my sites’ LiteSpeed checklist for its cache plugin settings. Also, I keep the plugin current each version change.
What is LiteSpeed LSWS & LSCWP?
There is a LiteSpeed Web Server (LSWS) and it’s about the 4th most popular one as of 2024. It uses a similar format as Apache Server and works with most of Apache features. It acts as an Apache drop-in replacement. OpenLiteSpeed is its open source edition of LiteSpeed Web Server Enterprise.
LiteSpeed Technologies also has created a world class caching plugin for WordPress (LSCWP) that works best with LSWS but also works well with other web servers such as Apache, NGINX, and others.
Introduction to LiteSpeed Cache Plugin Settings
To start, read my post “LiteSpeed WordPress Plugin for Caching“. It shows how to get the plugin, install it, and activate it. Then, follow its initial steps of basics. It’s quick and simple. It’s also best if you have generated your own free QUIC.cloud account but, if you haven’t that’s okay. You can do that in this post to enable yourself to configure a ton of the extra caching features shown here. So, yeah, you can start here after you’ve activated the plugin.
About Configuring Each LiteSpeed Plugin Section
All LiteSpeed Cache Plugin Settings are separated by their own major menu sections. So, this post follows its menus exact, same order. Regardless, use my table of contents to easily jump to any particular section’s settings. Return often, to stay current on the latest changes and improvements. Remember, this is my checklist I use and maintain to match the most current plugin version.
LiteSpeed Nomenclature
Finally, there are several naming, acronyms, and misspellings used when referring to LiteSpeed server and its WordPress plugin. See this list to recognize them when looking through various articles and guides.
- LSWS (LiteSpeed Web Server)
- lscwp & lscwp plugin (LiteSpeed Cache WordPress)
- lscache & lscache plugin
- litespeed wp plugin
- lite speed, litespeed, LiteSpeed, & light speed
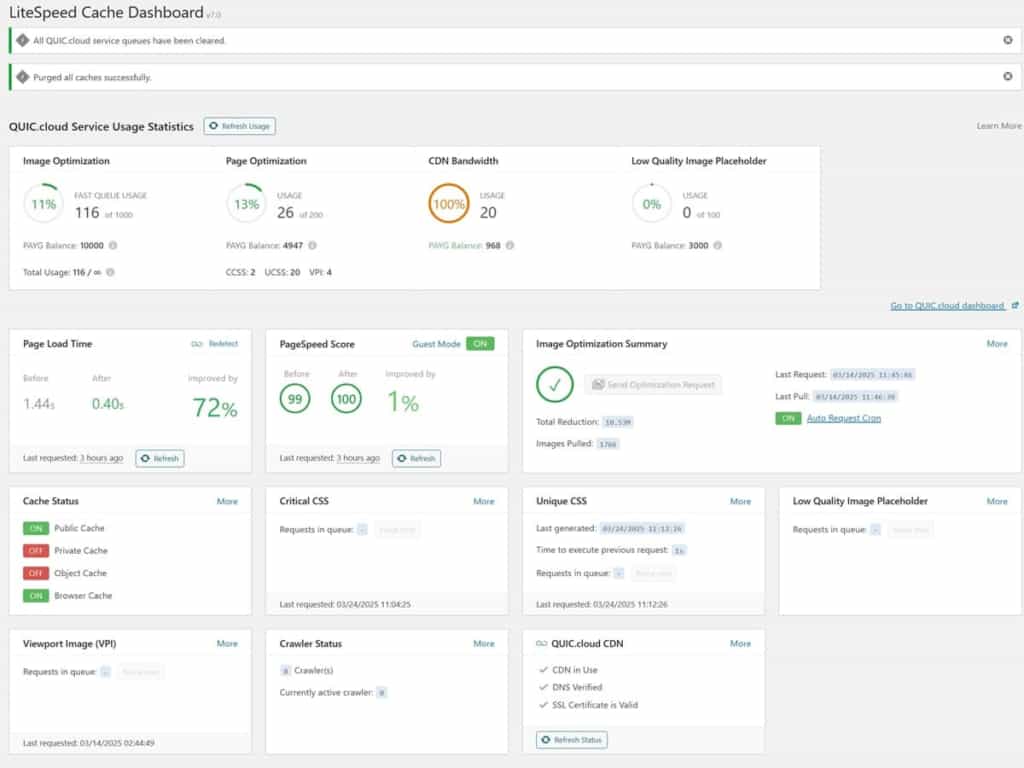
1. Dashboard Section
The LiteSpeed Cache Dashboard is a great overall picture of what’s going on. It’s a good idea to look it over at times. What you’re looking for is any indication of something remaining in a queue for a good while. In some cases, you can tap a pending process to hurry it along.
2. Presets Section
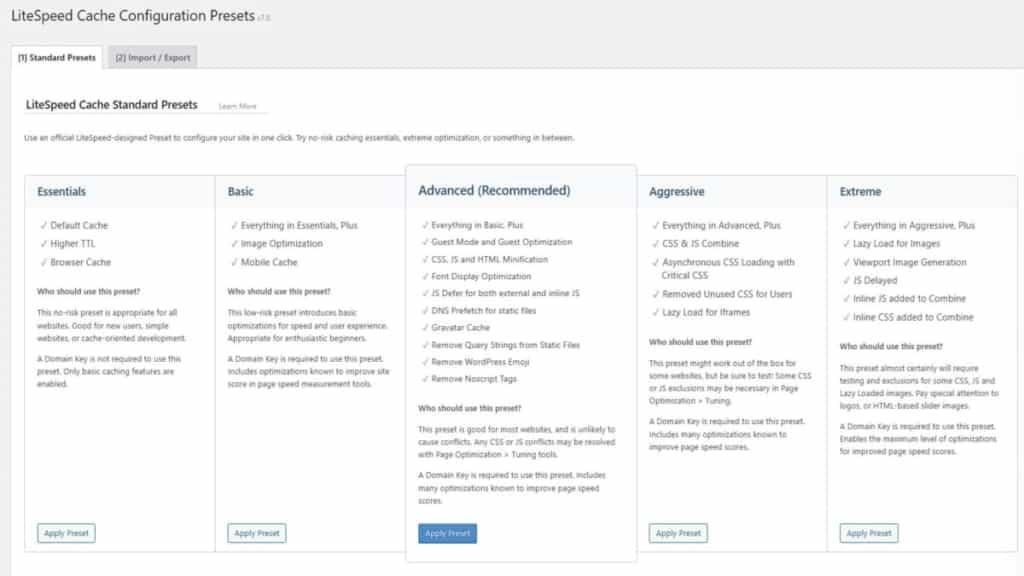
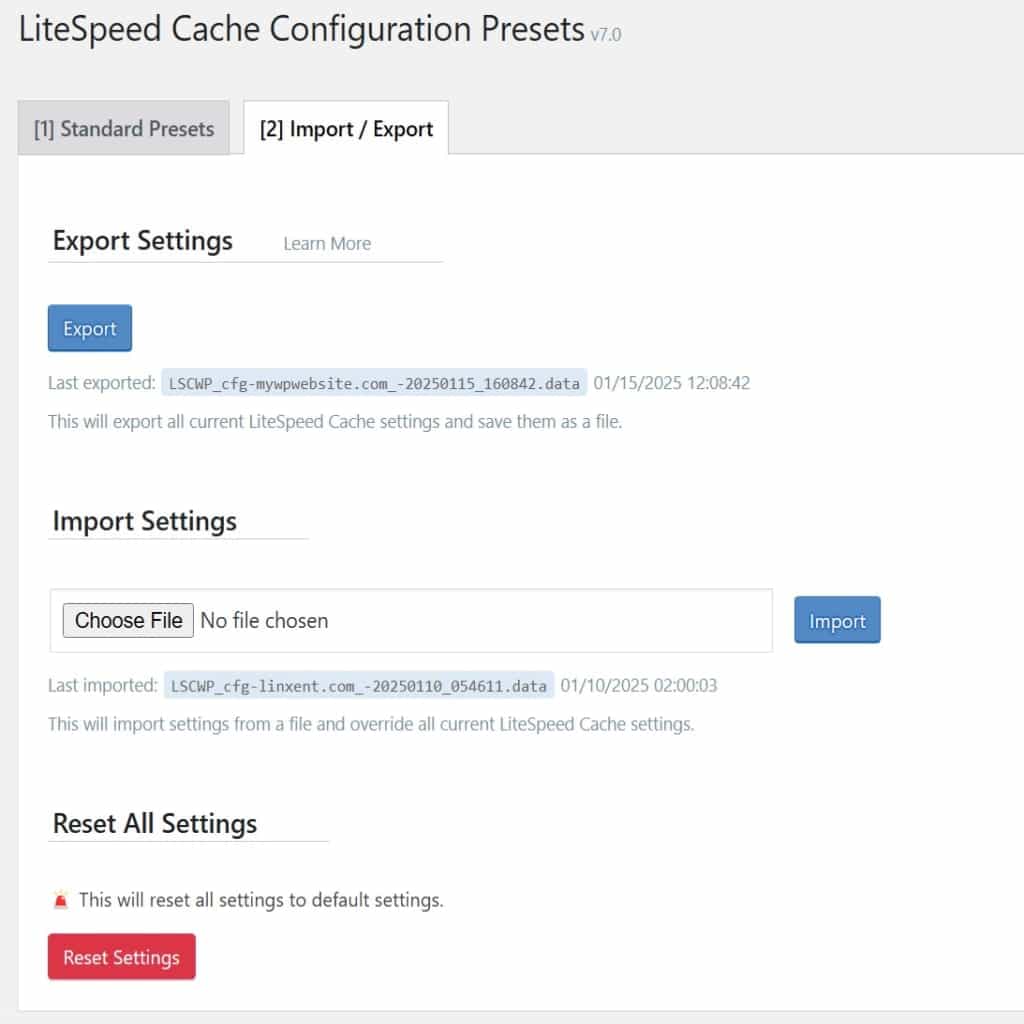
The LiteSpeed Presets section is good for initially applying a bunch of standardized default settings to match your desired starting level of caching. It also has a tab for exporting, importing, and resetting your settings. So, the presets area has the followings tabs:
2a. Presets: tab Standard Presets
This section is really good to get you started quickly with LiteSpeed caching, even if you don’t yet have a domain key linked to QUIC.cloud or don’t yet have any CDN configured. Regular small sites with no e-commerce, no ads, no food recipes, and no special functions may do fine with the “Aggressive” or “Extreme” presets. I typically start my sites off with the recommended “Advanced” preset.
2b. Presets: tab Import Export
Every time I make changes to the lscwp settings, I come here and backup those settings by tapping the <Export> button. I save that settings file with my domain under a folder for backups – LiteSpeed Cache. Finally, sometimes I’ll add a small text file in that folder that describes the reasons for any of the changes.
3. General Section
The General section has the followings tabs:
- Online Services (NEW in 2025)
- General Settings
- Tuning
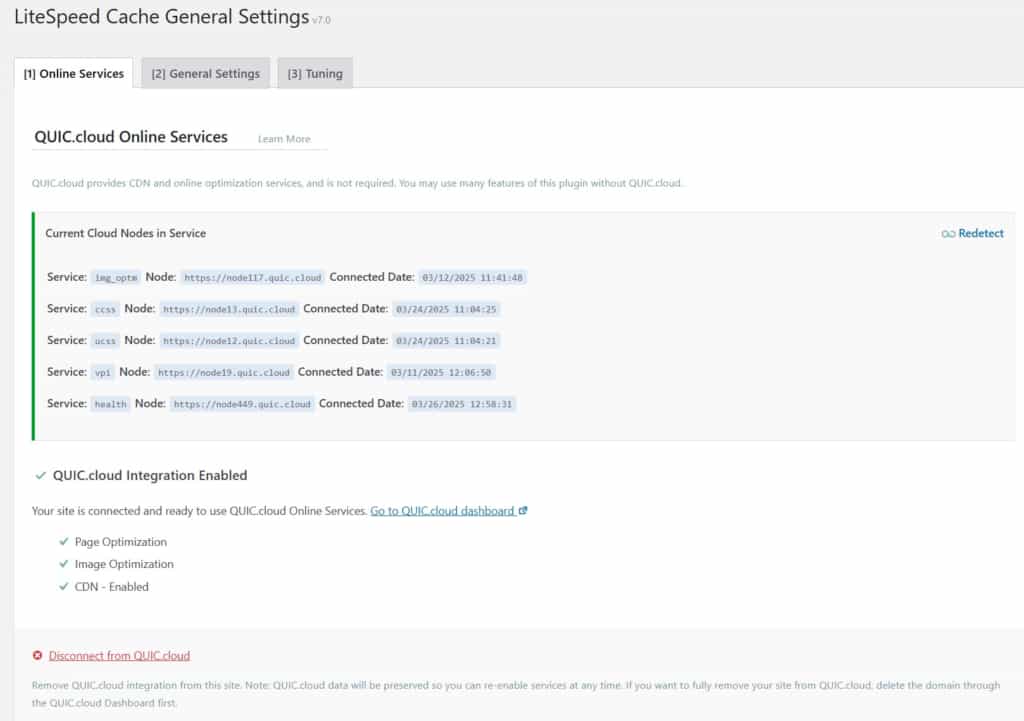
3a. General: tab Online Services
After you’ve used your free QUIC.cloud account to add this domain, it will gradually update this screen to show your current ONLINE SERVICES. This varies in time but mine typically started to show nodes in 10-60 minutes after the account automatically assigned a domain key.
3b. General: tab General Settings
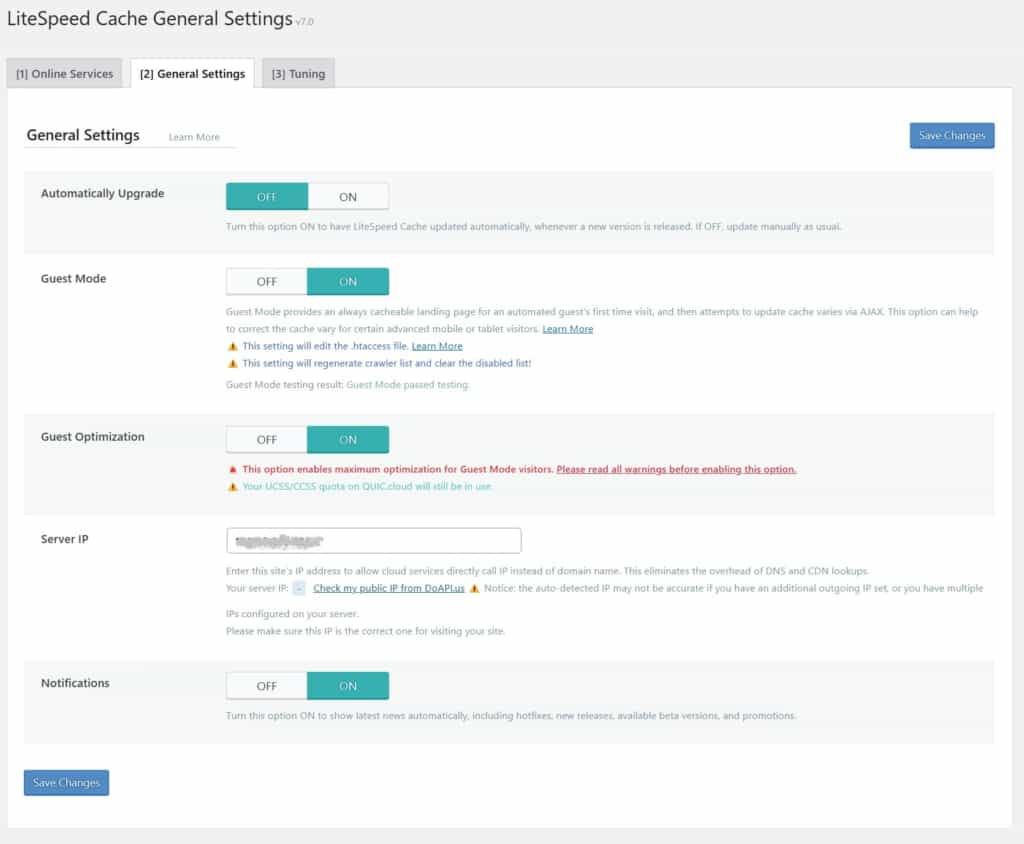
Here are my current GENERAL SETTINGS I use:
- Automatically Upgrade: Off
- Guest Mode: On
- Guest Optimization: On
- Server IP: _____________. Just tap “Check my public IP…” and it will show you your domain site’s IP to type in here. When you enter its IP, you’ll have a slightly better performance for some aspects. Otherwise, you can leave it blank.
- Notifications: On (or can leave it off)
3c. General: tab Tuning
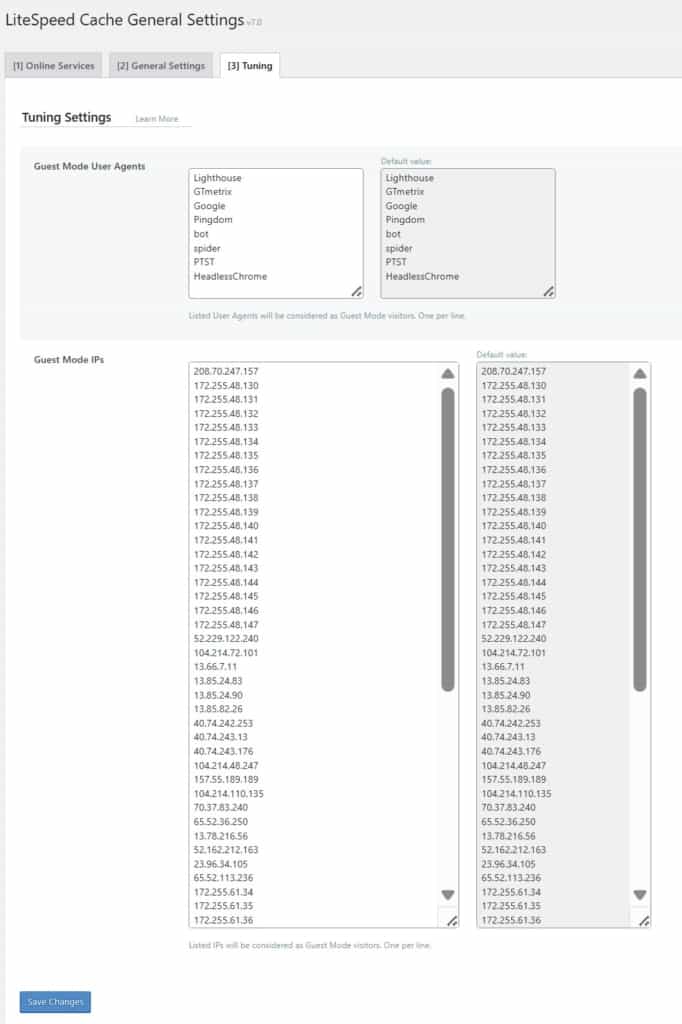
I make no changes to the default TUNING configuration. The IP addresses are automatically derived; however, it does allow you to add any, if needed. Also, the default list of guest mode user agents allows you to add more or remove any. Again, I don’t make any changes here on my sites.
4. Cache Section
This key area is to setup LiteSpeed Cache specifically. It has the following tabs to use to configure LiteSpeed cache:
Expert Tips on How to Manage Multiple Caching Systems
Generally, having more than one caching system isn’t recommended. However, because there are many caching scenarios, there are some cases more than one is required. Here are some expert tips to review.
- Object Cache should be enabled (Redis or Memcached). The LiteSpeed plugin doesn’t do object caching. Changing some LS plugin settings sometimes disables your server’s object cache. So, it’s just a matter to re-enable it (via its plugin) each time it prompts you. Also, it’s a good practice to check if object cache is still running after you’ve made any changes to the LiteSpeed plugin.
- EWWW: The LiteSpeed settings do NOT use this plugin. So, decide between using LiteSpeed or EWWW.
- Lazy Loading: These days, many themes and plugins have options for enabling lazy loading of images. Some added features in LiteSpeed require its own lazy loading to be enabled. Therefore, if experiencing any lazy loading conflicts, it’s better to debug by turning off theme or other plugin’s lazy loading options.
4a. Cache: tab Cache
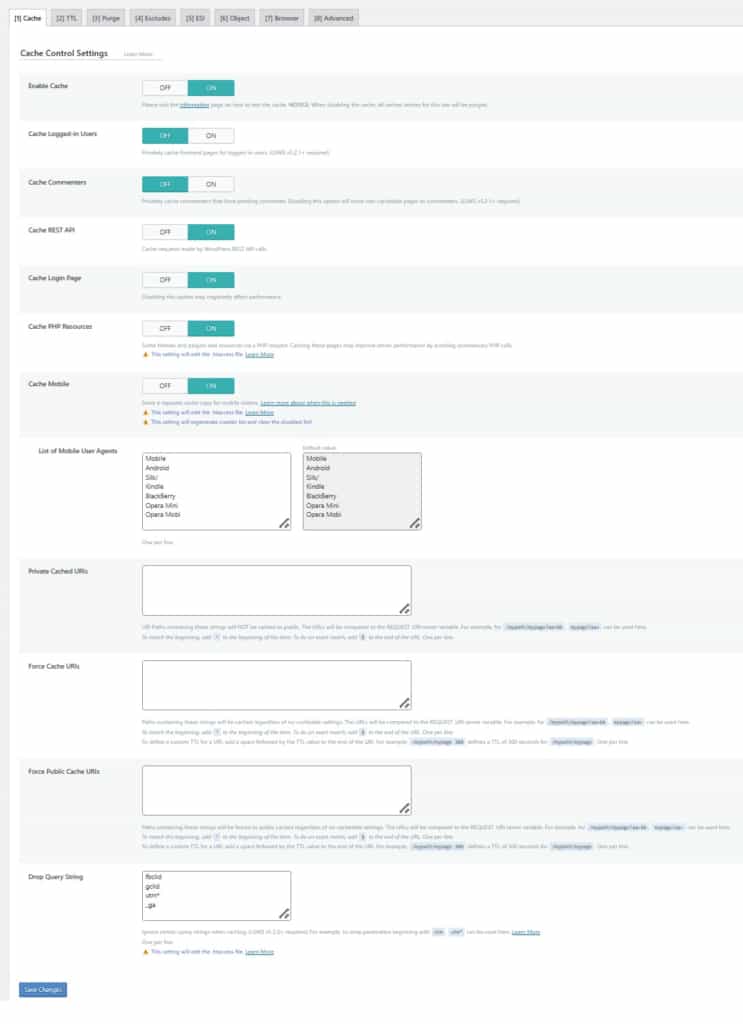
This is specifically for the focus on LiteSpeed Cache Settings. I use the following CACHE config:
- Enable Cache: On
- Cache Logged-in Users: Off
- Cache Commenters: Off
- Cache REST API: Off (If enabled, this setting ties to WP themes and the WPRM plugin and might have impact).
- WPRM plugin: Here is a message example from WPRM plugin when checking WPRM Recipes Health: 🔌 LiteSpeed Cache might be breaking recipe saving. There have been issues with LiteSpeed Cache breaking the recipe saving if the “Cache REST API” setting is enabled on the LiteSpeed Cache > Cache page.
- WPRM plugin issue: If Cache REST API is enabled, it was discovered to break the recipe “screen staying active” button Custom Color, for example.
- Cache Login Page: On
- Cache PHP Resources: On
- Cache Mobile: On
The rest of the items are lists and contain default entries. It allows you to add any custom ones you might discover you need to add. I don’t add any others for my sites.
4b. Cache: tab TTL
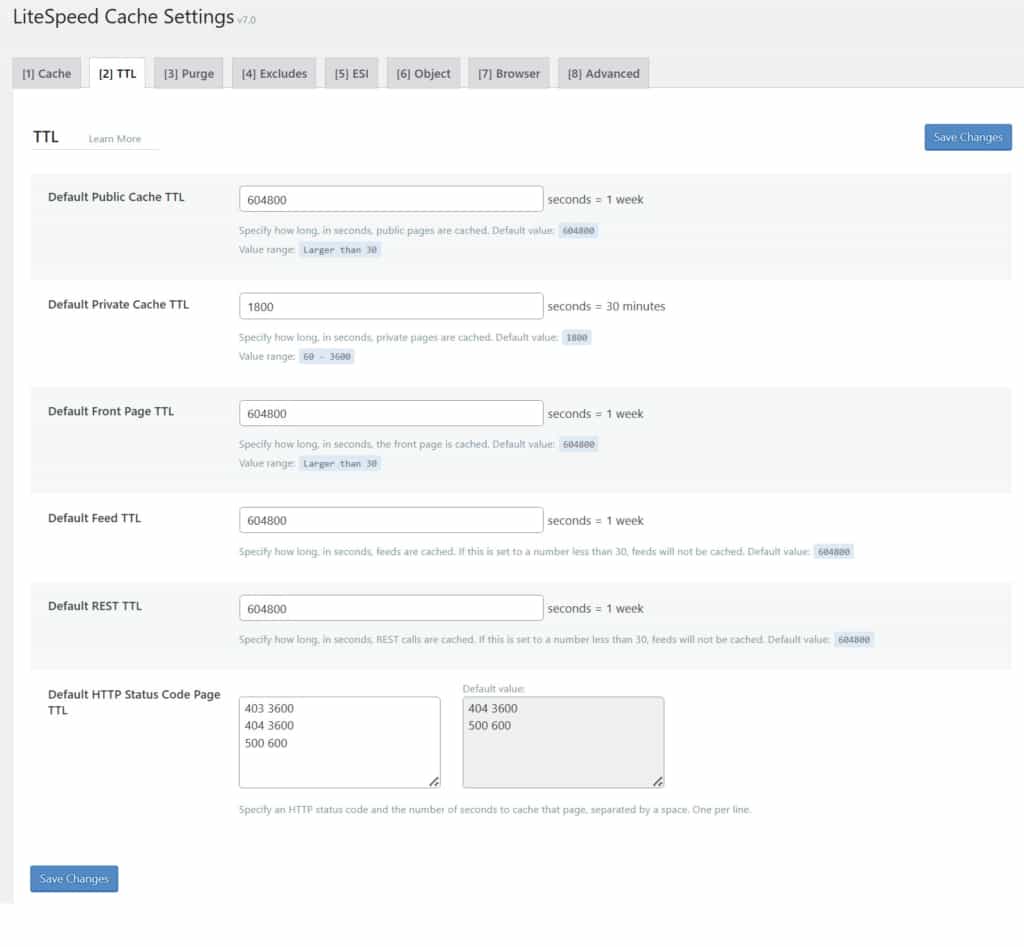
I use the following TTL config:
- Default Public Cache TTL: 604800
- Default Private Cache TTL: 1800
- Default Front Page TTL: 604800
- Default Feed TTL: 604800
- Default REST TTL: 604800
- Default HTTP Status Code Page TTL:
- 403 3600 (I added in this line)
- 404 3600
- 500 600
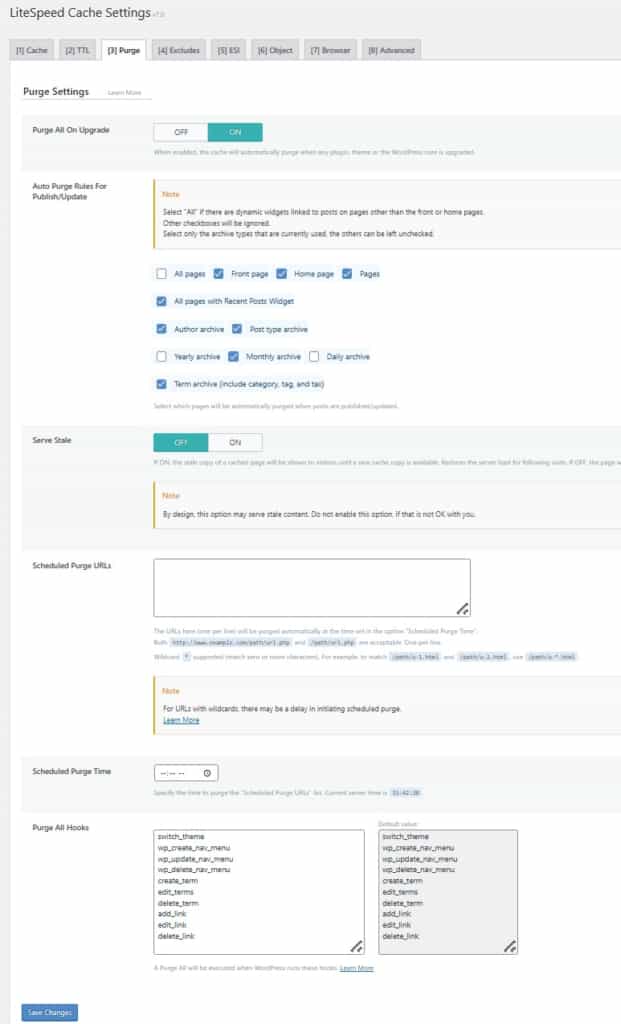
4c. Cache: tab Purge
I use the following PURGE config:
- Purge All On Upgrade: On
- Auto Purge Rules for Publish/Update:
- All selected except these: All pages, Yearly archive, Daily archive
- Serve Stale: Off (On will use resources and regular cache updating will eventually take place)
- Scheduled Purge URLs: empty
- Scheduled Purge Time: empty
- Purge All Hooks: default list shown
- Only if using ReallySimple SSL, add this line (no quotes) “rsssl_after_saved_fields”.
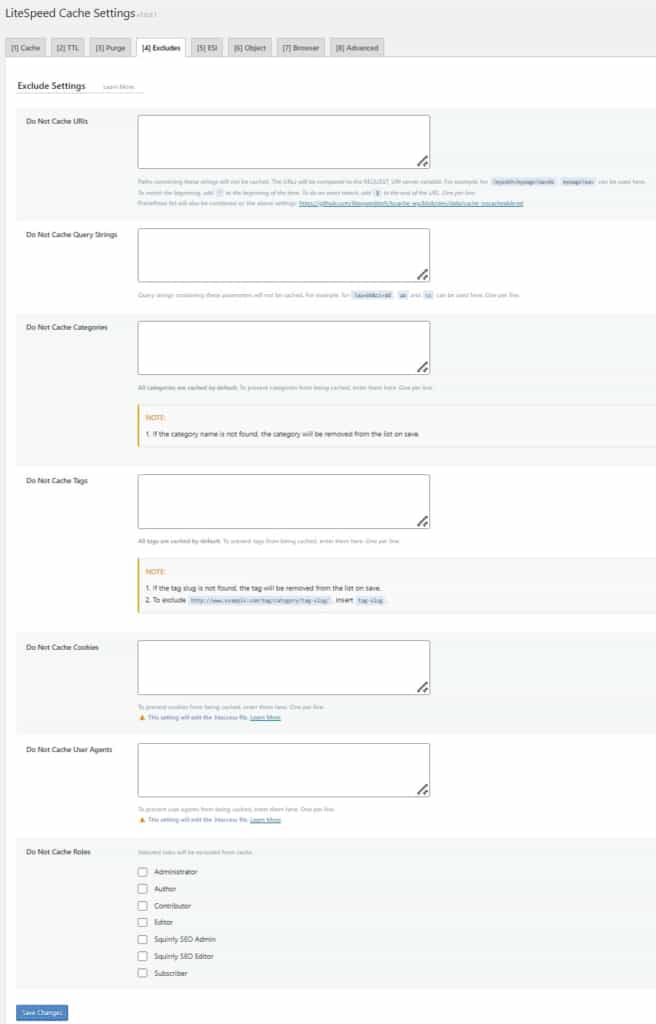
4d. Cache: tab Excludes
I use the following EXCLUDES config:
- Do Not Cache URIs: default is empty
- Only if using WPRM plugin: add “/wprm_print/” (no quotes). Otherwise, users can’t resize a recipe during a print preview just before printing.
- Do Not Cache Query Strings: empty
- Do Not Cache Categories: empty
- Do Not Cache Tags: empty
- Do Not Cache Cookies: empty
- Do Not Cache User Agents: empty
- Do Not Cache Roles: none selected
- Sometimes, I’ve selected all roles except “Customer” & “Subscriber”.
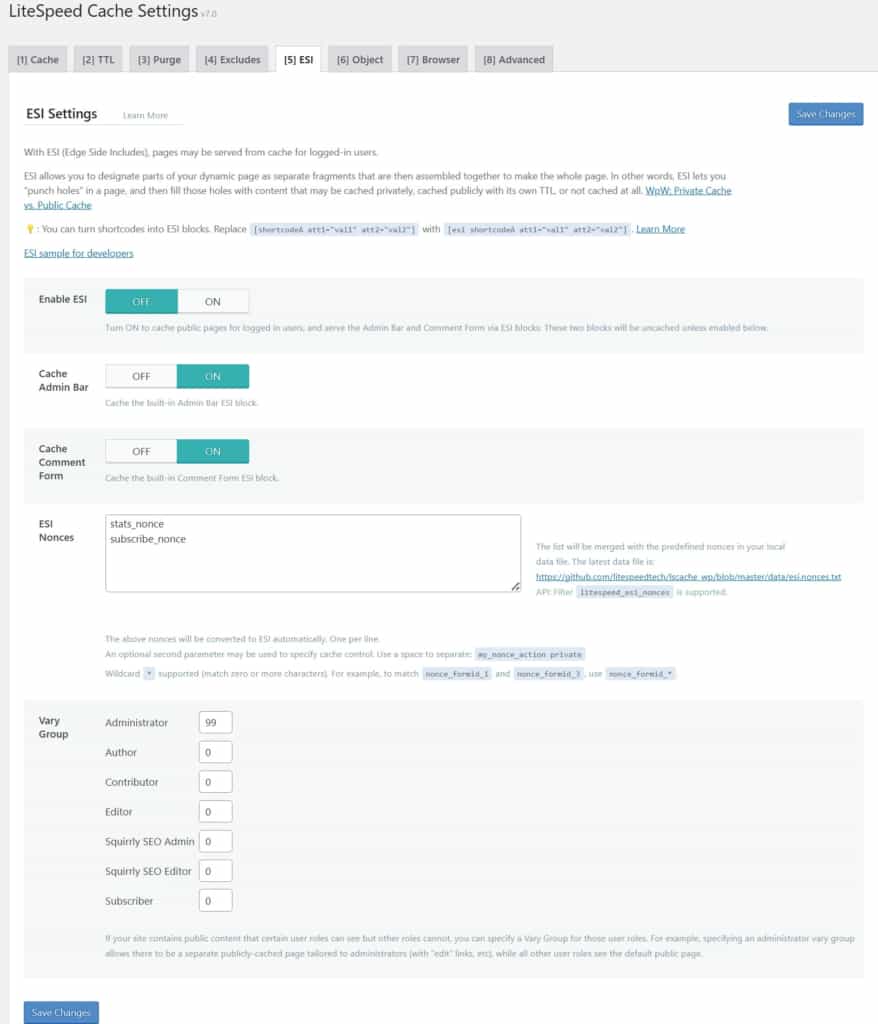
4e. Cache: tab ESI
I use the following ESI config:
- Enable ESI: Off
- Cache Admin Bar: On (but, sometimes I turn mine off due to it not showing all things correctly all the time)
- Cache Comment Form: On
- ESI Nonces: 2 default row items are – stats_nonce, subscribe_nonce
- Vary Group: All=0, except Administrator=99
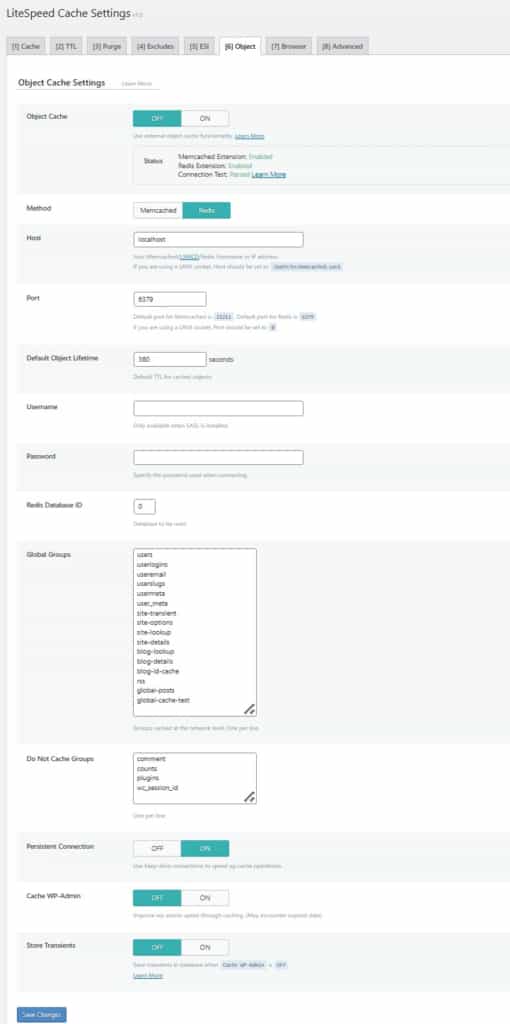
4f. Cache: tab Object
I use the following OBJECT config:
- Object Cache: Off
- Turned OFF because of other people’s recommendations when using too many cache methods. When enabled, it speeds up query results (and filters) but there were times where it wouldn’t refresh subsequent filtered paging for grid filters.
- Status will be shown; it’s only important that the object cache (if any) you want to use has its extension shown as “enabled” and the connection test is “passed”.
- Status of Memcached Extension shows: Enabled
- Status of Redis Extension shows: Enabled
- Status of Connection Test shows: Passed (If it shows “Failed”, ck the Port number that must match the Redis (or Memcached) port nbr in use.
- Method: Redis (if this was requested to be enabled on the server)
- Host: localhost
- Port: 6379 (default: 11211; this must be updated when using Redis if also using a shared IP address, even though your server itself might not be shared)
- Default Object Lifetime: 360
- Username: (empty)
- Password: (empty)
- Redis Database ID: 0
- Important: Default is 0. However, with multiple sites in various scenarios, you might have a newly created redis database with a different ID number.
- Global Groups: default list
- Do Not Cache Groups: default list
- Persistent Connection: On
- Cache WP-Admin: Off
- Store Transients: Off
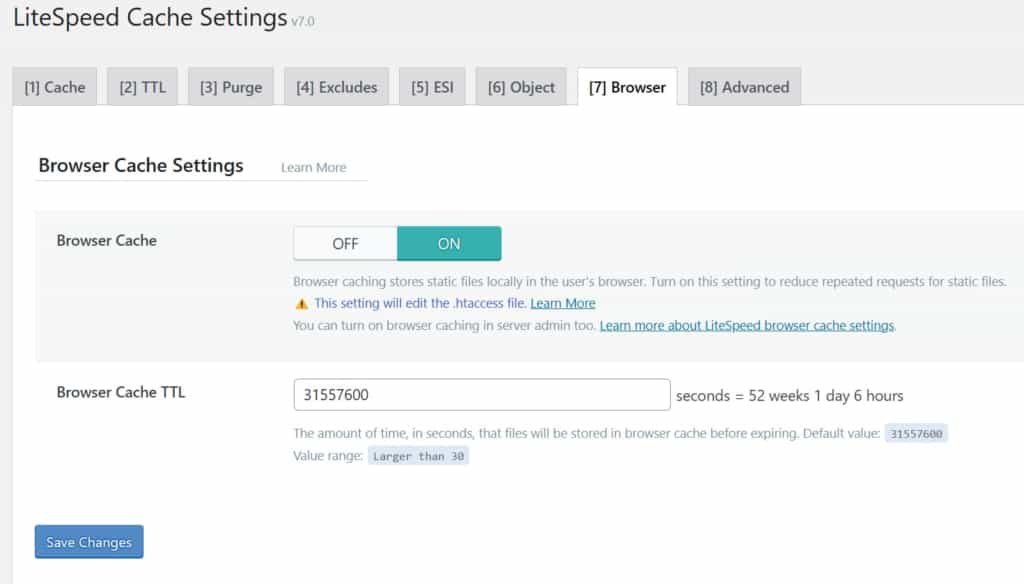
4g. Cache: tab Browser
I use the following BROWSER config:
- Browser Cache: On
- Browser Cache TTL: (choose an option below)
- default (1 yr): 31557600
- for max performance (1 yr + 1 da): 31536000
- for commerce, frequently changing, or more dynamic sites (4 weeks): 2419200
4h. Cache: tab Advanced
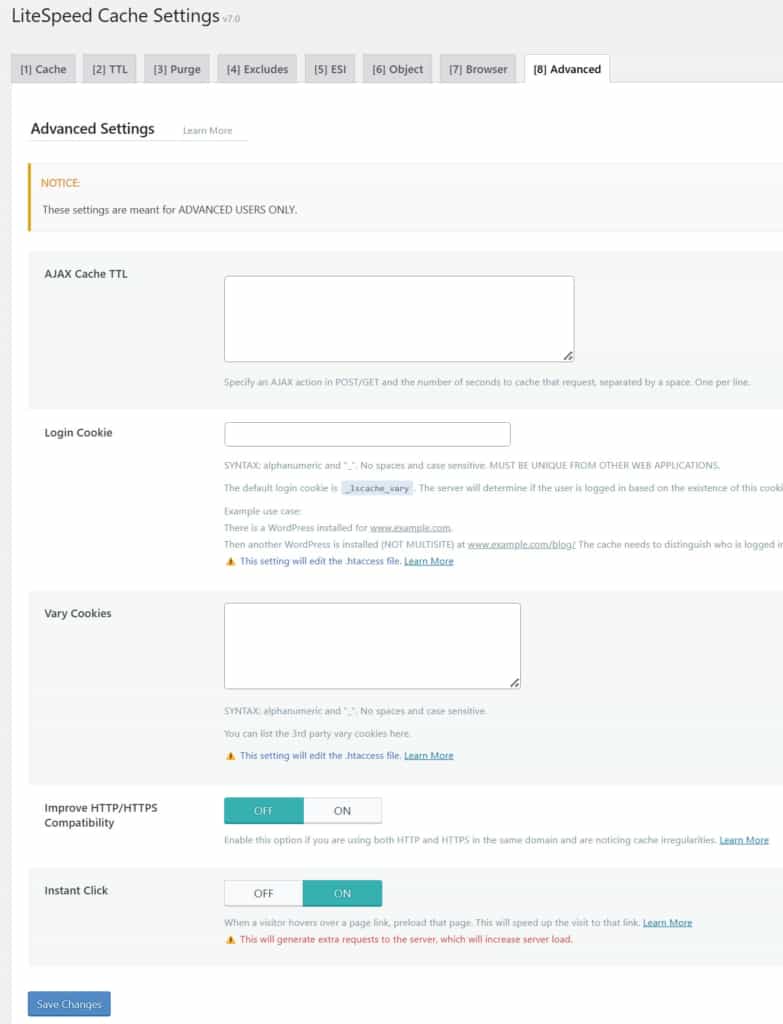
I use the following ADVANCED config:
- AJAX Cache TTL: empty
- Login Cookie: empty
- Vary Cookies: empty
- Improve HTTP/HTTPS Compatibility: Off
- Instant Click: ON
- This preloads links when hovered for improved user experience. However, it increases server load. So, if more server power is needed, turn OFF.
5. CDN Section
The CDN section has all of these changed tabs in 2025:
IMPORTANT CDN Setup Expert Steps
Having your site utilizing a CDN system, as mentioned in my “Website Requirements” post, helps its performance worldwide and also across one’s own country. So, ensure you made having a CDN as a part of your Website Project Plan.
Step 1: When to Setup CDN
It’s best to setup all other plugin settings first and reserve CDN setup for last. Here’s a list of reasons why.
- CDN global services (bandwidth) don’t handle frequent major image caching changes while optimizing. So, it’s best to wait for LiteSpeed processes to fully optimize.
- It may take over a day to optimize for over 100 posts. You can check LiteSpeed main switchboard for each domain to see if all items are completed. Otherwise, you won’t get a true picture of performance catching up after a settings change.
Step 2: Know your Pre-requisites Before CDN Setup
- Only if planning to fully enable CDN, ensure you have the capability to change your name servers in your Domain settings for your domain name (Important: don’t change nameservers via DNS Zone settings).
- If using free Cloudflare as your domain registrar, you probably won’t have permissions to change your nameservers.
Step 3: How To Setup LiteSpeed CDN using QUIC.cloud
You can use the lscwp plugin to connect with several different CDN options. This step covers only how to setup the LiteSpeed CDN using your QUIC.cloud account.
Also, be prepared to fund a starting portion of establishing your LiteSpeed CDN. It’s very economical compared to other commonly known CDN services.
Step 3a: Enabling CDN & DNS Option
- Within your account’s selected domain (in QUIC.cloud), tap to <Enable CDN>. It will start the wizard-like setup process for the QUIC.cloud CDN Setup. There are 2 optional methods to choose from. The strongly preferred method is via ”I want to use QUIC.cloud DNS” and NOT selecting “I want to use CNAME”. That second option requires you to add or edit DNS records (from your current hosting nameservers). So, after selecting your choice to use QUIC.cloud DNS, tap <Confirm Choice>.
Step 3b: Processing Nameserver Changes
- It will review data in your existing domain’s nameservers and will use them to create your own new DNS zone records in QUIC.cloud nameservers. After a couple of minutes, it will be done displaying the zone records that will go into your CDN’s nameservers. Then, tap <+Enable and Add Records>.
- After about 15 seconds, you’ll be given the QUIC.cloud CDNs nameservers to change your current hosted Domain’s NameServers to use.
- Next, login to your domain host’s client account and locate where this domain allows you to edit that domain’s nameservers. Also, take notes of what they were so, you can change them back, as needed in the future. Submit the new CDN nameservers to your domain.
Step 3c: Confirming DNS Changes are Recognized
- Return to the “Status” section and tap (on the far right side) the link to “refresh status”. It will check to see if enough propagation has transpired to effectively reflect your domain is now operating on the new CDN system.
- The main importance is to verify the DNS shown at the registrar is reflected correctly. So, use a DNS checkers to confirm the change is being received and your site is still seen by the outside world:
- Popular DNS checker: https://intodns.com/
- Real good visual DNS checker: https://dnschecker.org/
- Some DNS checkers might reflect a few locations bouncing back and forth between the original and the newer assigned nameservers. This can be normal. Just check back in 1-2 days and it will settle due to all the other caching methods used elsewhere.
- Keep in mind, that it’s usually not finished propagated worldwide 100% but often is within 1-2 days fully.
Step 3d. CDN Active Status Confirmation
- Initially, after the CDN connects ok (after nameservers have been fully accepted and propagated), there might be an SSL Certificate error. It will automatically be issued later, usually in about 10 minutes or less.
- Finally, go to your LSCache plugin and go to the CDN settings in the QUIC.cloud tab and check to confirm CDN status. It will update periodically and sometimes it can take over an hour.
Alternatively, you can also see LiteSpeed’s Guide to CDN Setup.
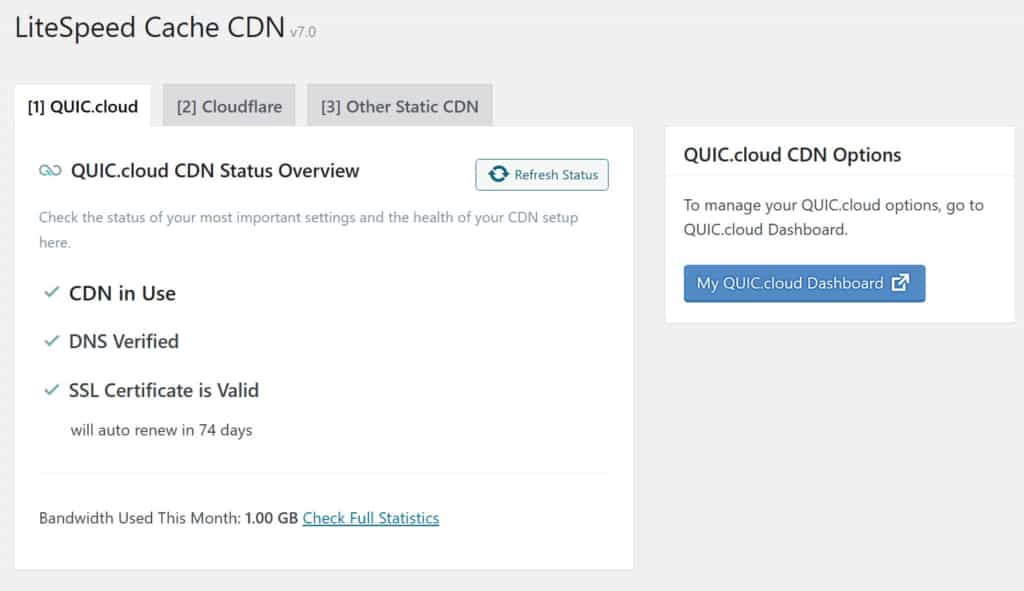
5a. CDN: tab QUIC.cloud
This gives an easy URL to go to QUIC.cloud for creating a new account or going directly to your existing one.
After I joined my domain to QUIC.cloud and setup its CDN, this tab reflects an easy to read status report of each important service.
5b. CDN: tab Cloudflare
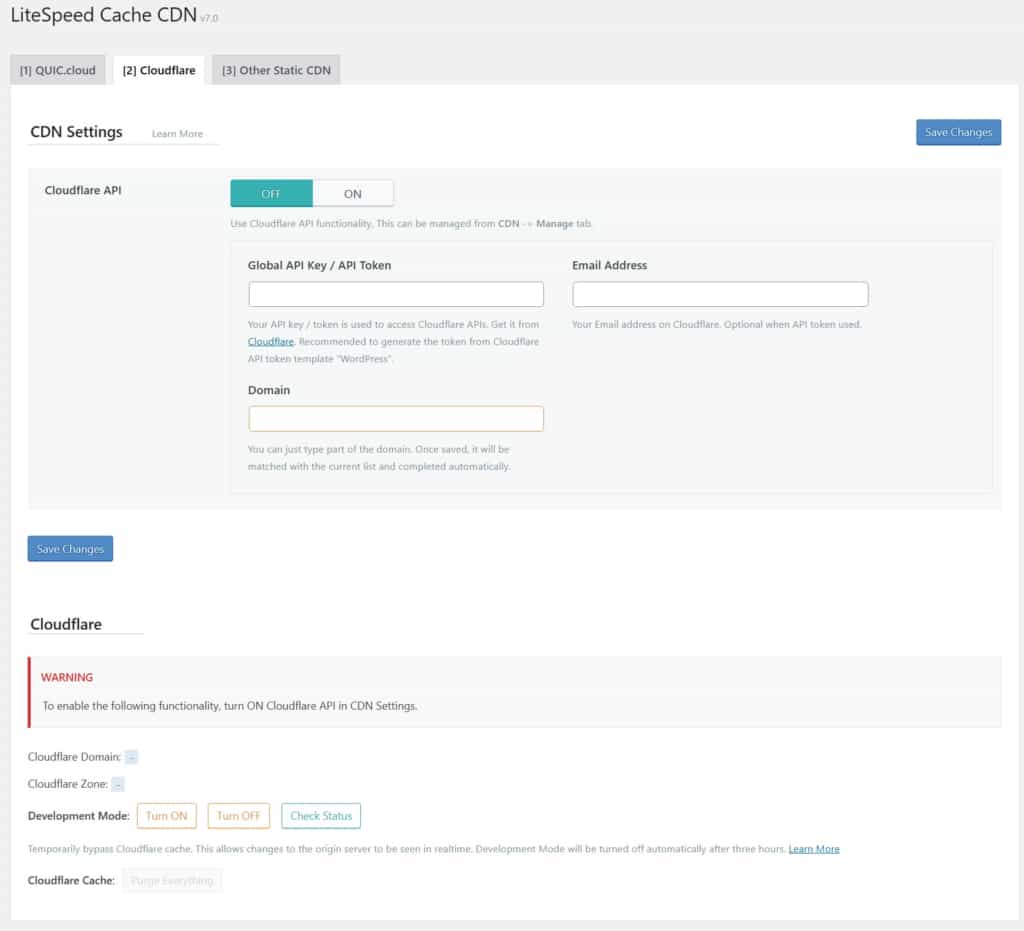
Here’s the section for those who prefer to use Cloudflare’s CDN. Once to tap the Cloudflare API option to “ON”, the screen settings will change so you can just populate those entries and <Save Changes>.
- Cloudflare API: OFF (Enable to ON, only if intending to use Cloudflare CDN).
These next settings are only if using Cloudflare CDN:
- Cloudflare API: ON (only if wanting to connect to your established Cloudflare CDN account)
- Global API Key / API Token: supplied by Cloudflare
- Email Address: used for your Cloudflare account
- Domain: populated to match applicable domain in your Cloudflare account
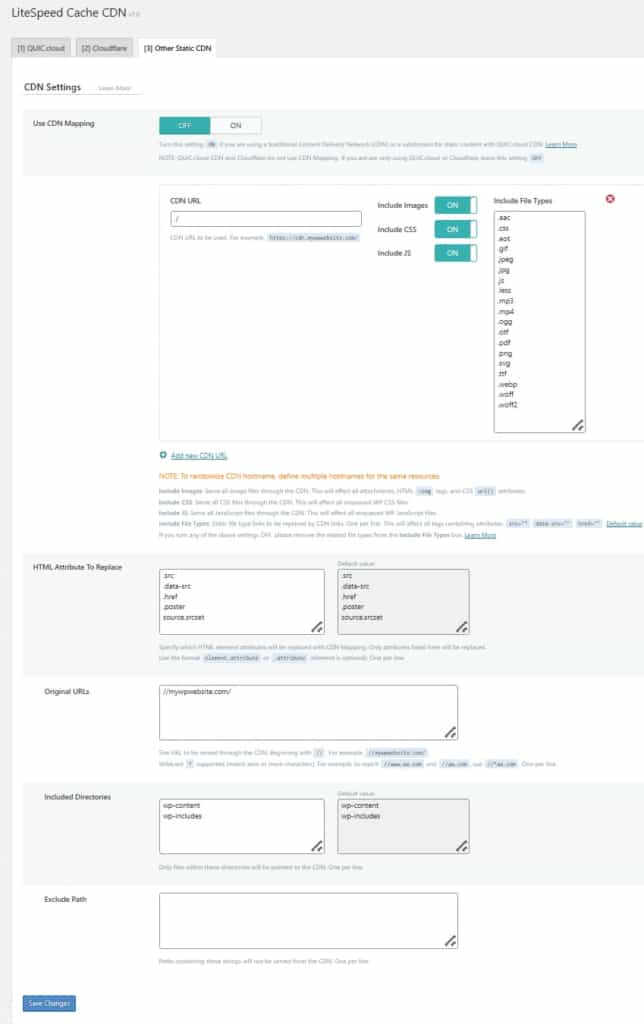
5c. CDN: tab Other Static CDN
Finally, you can refine any custom requirements you might have regarding CDN Settings. I don’t make any changes here. Also, it’s auto populated my site’s domain in the “Original URLs” entry. The LiteSpeed documentation suggested not to alter that format used.
- Use CDN Mapping: OFF
- If CDN is QUIC.cloud CDN or Cloudflare CDN, leave it OFF.
- CDN URL: (leave default of a slash “/” as is)
- Include Images: ON
- Include CSS: ON
- Include File Types: default list is fine; add any additional if needed, e.g., LibreOffice file types.
- HTML Attribute to Replace: default list is fine
- Original URLs: default prepopulated domain name is fine
- If fixing an entry or adding a subdomain, use format like “//shop.mydomain.com/”
- Important: Add-on domains should use the standard regular domain format like “//mydomain.com/” as they are viewed as their own domain.
- Included Directories: default list is fine; add in any others desired as relative paths.
- Exclude Path: empty
6. Image Optimization Section
The Image Optimization section has the following tabs:
Expert Tips on NextGen Image Creation & Optimizing
- Disabling to not Create WebP or AVIF Images: I only tested these next “disabling image creation” comments in lscwp plugin version 6.x, so it’s unknown if version 7.x handles this better.
- If you intend to have either WebP or AVIC images, NEVER disable to create WebP/AVIF images. If you do, the server won’t restart that feature (even though the setting change would be allowed). And, it can’t check to optimize anything that’s already been there, including changed images, and added images. The only workaround is (after this was re-enabled) you have to “destroy” all image optimizations and start it over with Webp images that would then being created.
- More Expert Tips about Image Optimization
About The LSCWP Plugin Image Optimization Process
Here are some aspects to better understand the LiteSpeed plugin’s image optimization process involving the NexGen (WebP / AVIF) media.
Testing LSCWP plugin for Image Optimization
It was tested with WebP images to be produced using the LSCWP plugin (version 6.x). Initially, the images were uploaded as JPG file types and were then discovered optimized by the LSCWP plugin. The newly created WebP images were smaller than the original JPG images.
Why does LiteSpeed sometimes display the original, larger size image file?
However, LiteSpeed did NOT appear to always choose the lower sized image (between WebP and JPG). Also, at times, it would even delete the WebP image to utilize showing a JPG image. This was originally thought to be an issue in my mind, because it didn’t always choose to display the smaller sized image. After more than one hosting service, it was eventually explained to me that the only time a WebP file would be displayed is if it was 45% smaller than the JPG image. It was also explained that it was done that way due to the added processing it takes to display a WebP image.
Is there a performance gain for using WebP or AVIF images?
So, I tested two separate time periods with several days each time. I tested using only the original image JPG formats and compared it with the NextGen (WebP) option enabled. As it turned out, the LiteSpeed plugin made the site performance metrics about 2-6% faster with WebP being selected to be used. Also, the site metrics were far more stable and consistent over a period of time, when randomly checking.
How long does LiteSpeed image optimization take?
Finally, depending on site sizes, it can take a few days to finish NexGen image optimization, followed by caching of those optimized images across the CDN system.
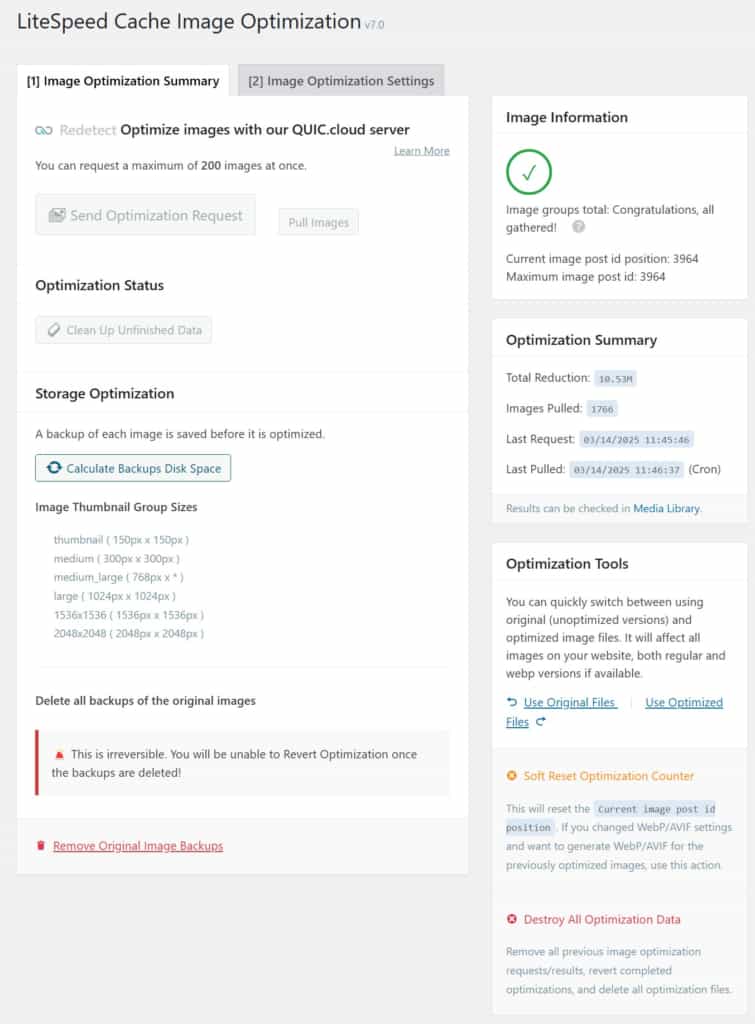
6a. Image Optimization: tab Image Optimization Summary
This is an excellent summary screen so you no longer have to go to the QUIC.cloud switchboard to check on these image metrics.
Use extreme caution when tapping these available options. There are links to review the purpose of each function. Some are irreversible.
6b. Image Optimization: tab Image Optimization Settings
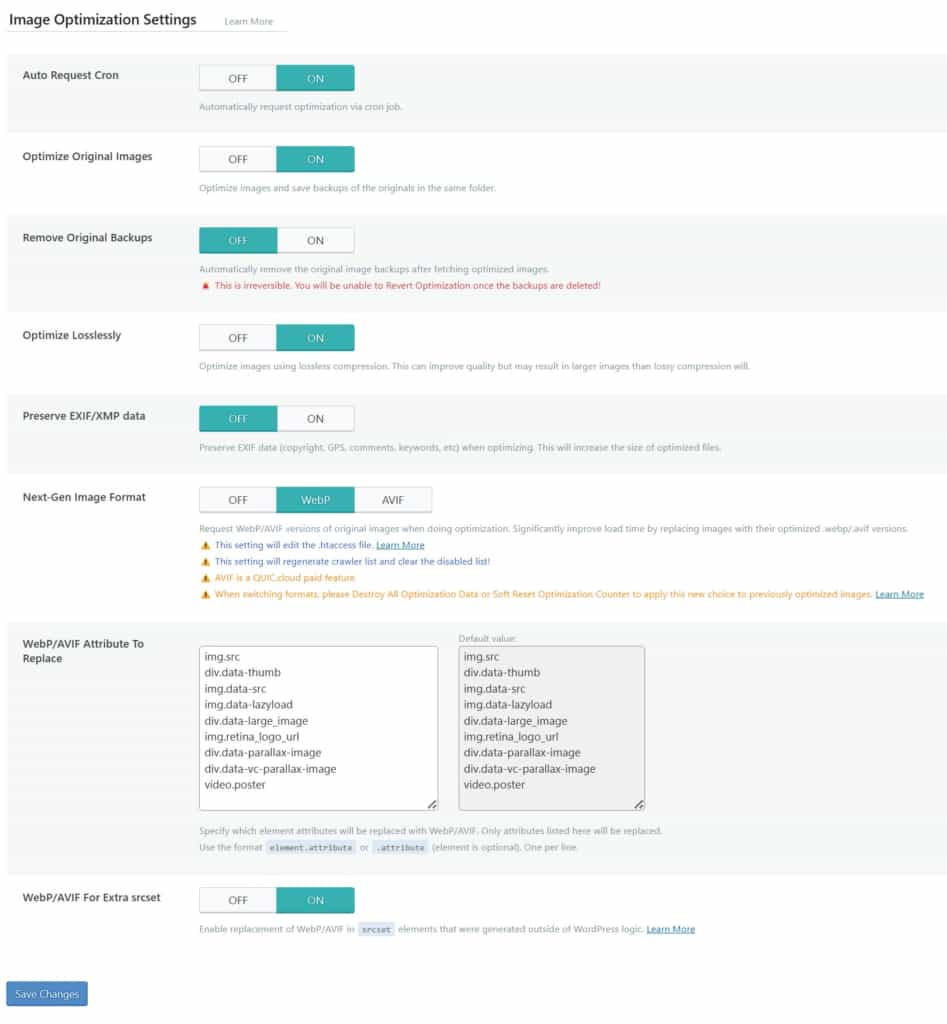
I use the following IMAGE OPTIMIZATION SETTINGS:
- Auto Request Cron: ON
- Optimize Original Images: ON
- Remove Original Backups: OFF
- Optimize Losslessly: ON
- Preserve EXIF/XMP data: OFF (or, if you need this data on images, enable to ON)
- Next-Gen Image Format: WebP or AVIF (This must be enabled, saved, and server restarted BEFORE Image Optimization begins; otherwise, you must click to “Destroy All Optimization Data” in Image Optimization | Image Optimization Summary (tab).
- WebP/AVIF Attribute To Replace: default list only
- WebP For Extra srcset: ON (in case any images are served via code, they will be as WebP)
For more reading on Image debugging, see LiteSpeed’s “Troubleshooting Media Issues“.
7. Page Optimization Section
The Page Optimization section is for LiteSpeed PageSpeed settings and has the following tabs:
- CSS Settings
- JS Settings
- HTML Settings
- Media Settings
- VPI
- Media Excludes
- Localization
- Tuning
- Tuning CSS
7a. Page Optimization: tab CSS Settings
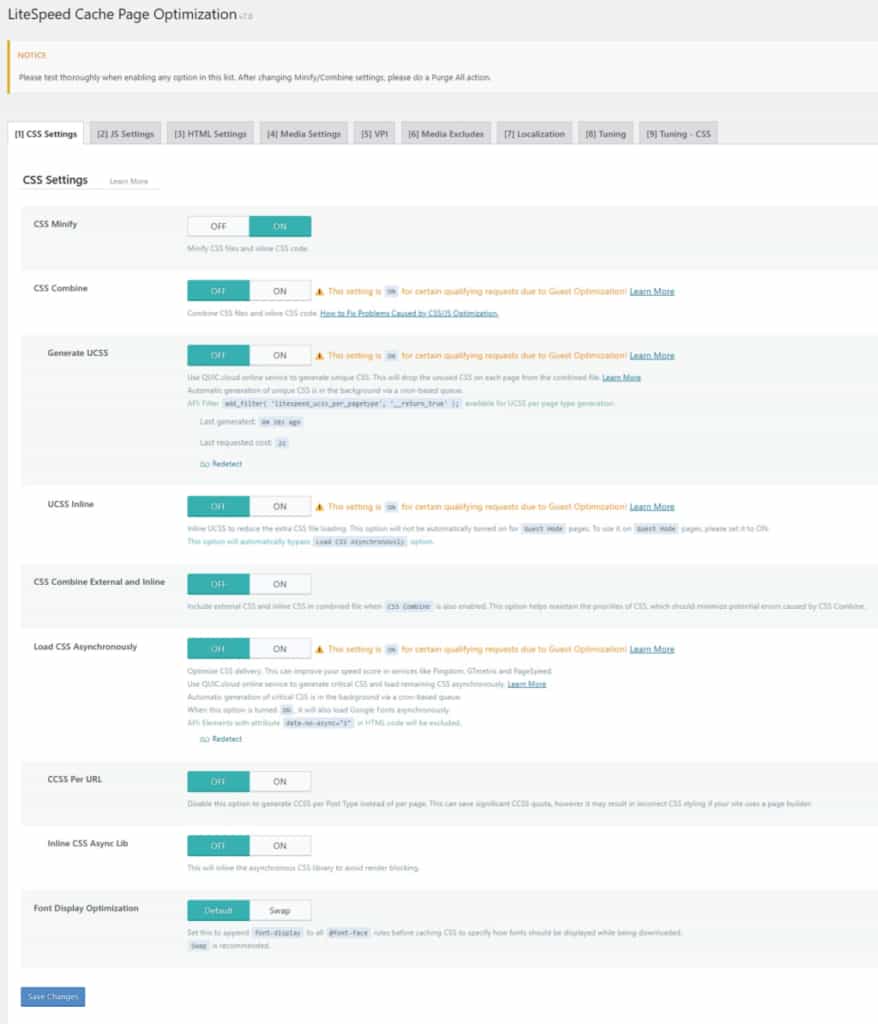
I use the following CSS SETTINGS:
- CSS Minify: ON
- CSS Combine: OFF
- Generate UCSS: OFF (make Off, if “CSS Combine” is Off); this helps remove unused CSS.
- UCSS Inline: OFF (make Off, if “CSS Combine” is Off). Needs to be off so that separate files can be created and cached into the HTML. If on, it will give better Insights scores but worse for users, which comes back later during Google’s actual user results. Media Masters suggests always to be off.
- CSS Combine External and Inline: Off; make this ON if “CSS combine” is On.
- Load CSS Asynchronously: OFF
- If using WPRM (recipe plugin), MUST be ON for maintaining certain recipe functions.
- Keeping OFF helps, if FOUC or CLS is too high.
- fm Media Masters article along with “CCSS per URL” as Off. For me, with both Off (“CCSS per URL” & “Load CSS Async…”), performed a full purge. 8 hrs later performance and metrics dropped noticeably. However, just turn this (“Load CSS Async…”) Off if FOUC or layout shift issues.
- CCSS Per URL: OFF
- If using WPRM (recipe plugin), MUST be ON for maintaining certain recipe functions.
- fm Media Masters article along with “Load CSS Async” as Off. For me, with both Off, performed a full purge. 8 hrs. later performance and metrics dropped noticeably.
- Inline CSS Async Lib: OFF
- If using WPRM (recipe plugin), MUST be ON for maintaining certain recipe functions.
- Media Masters recommends OFF because although CSS will be (avoiding) render-blocking, you’ll avoid FOUC issues.
- Font Display Optimization: Set to <Default>
- <Default> suggested by both Hostinger and Media Masters; Media Masters says it’s just to reduce FOUC. Consider to change to <Swap> if PSI test results reference to “ensure text remains visible during web font load”.
Also, for more info on handling CSS, see LiteSpeed’s “Troubleshooting CSS/JS Issues“.
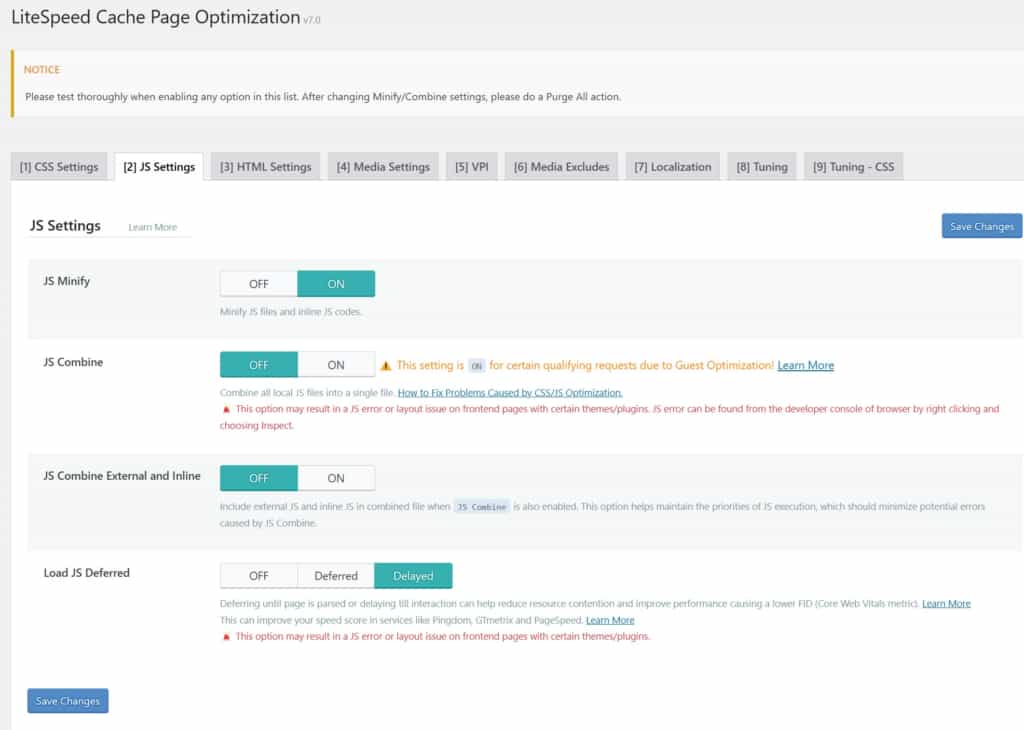
7b. Page Optimization: tab JS Settings
I use the following JS SETTINGS:
- JS Minify: ON
- JS Combine: OFF
- Suggested “Off” fm both Hostinger & Web Masters; you don’t combine JS with http/2 or large JS files.
- JS Combine External and Inline: OFF
- Set to ON, only if “JS Combine” is also ON.
- Load JS Deferred: Delayed
- If using WPRM (recipe plugin), MUST be <Deferred> for maintaining certain recipe functions.
- Important if using <Deferred>: Include any problematic files under “JS Deferred / Delayed Excludes” in “Tuning” tab.
Also, for more info on handling JS, see LiteSpeed’s “Troubleshooting CSS/JS Issues“.
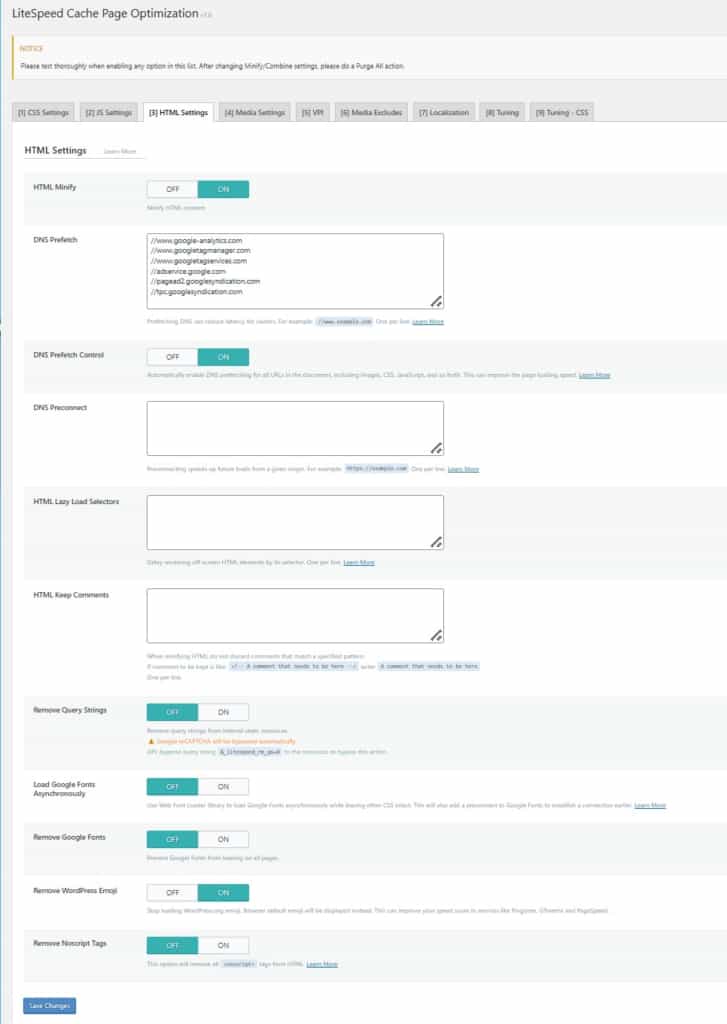
7c. Page Optimization: tab HTML Settings
I use the following HTML SETTINGS:
- HTML Minify: ON
- DNS Prefetch: empty
- If using Google Ads or Google Analytics, insert the following list:
- //www.google-analytics.com
- //www.googletagmanager.com
- //www.googletagservices.com
- //adservice.google.com
- //pagead2.googlesyndication.com
- //tpc.googlesyndication.com
- Media Masters says this: open your third-party code report in PSI and look at all third-party domains loading on your site. Ignore CDN URLs + fonts.gstatic.com since they should use preconnect instead of prefetch. Next, eliminate all third-party code that is being delayed. The only domains you should prefetch are the ones left after that.
- If using Google Ads or Google Analytics, insert the following list:
- DNS Prefetch Control: ON
- DNS Preconnect: empty
- HTML Lazy Load Selectors: empty
- HTML Keep Comments: empty
- Remove Query Strings: OFF
- Load Google Fonts Asynchronously: OFF (I use System fonts)
- Remove Google Fonts: OFF
- Remove WordPress Emoji: ON
- Remove Noscript Tags: OFF (making this Off ensures compatibility with older browsers)
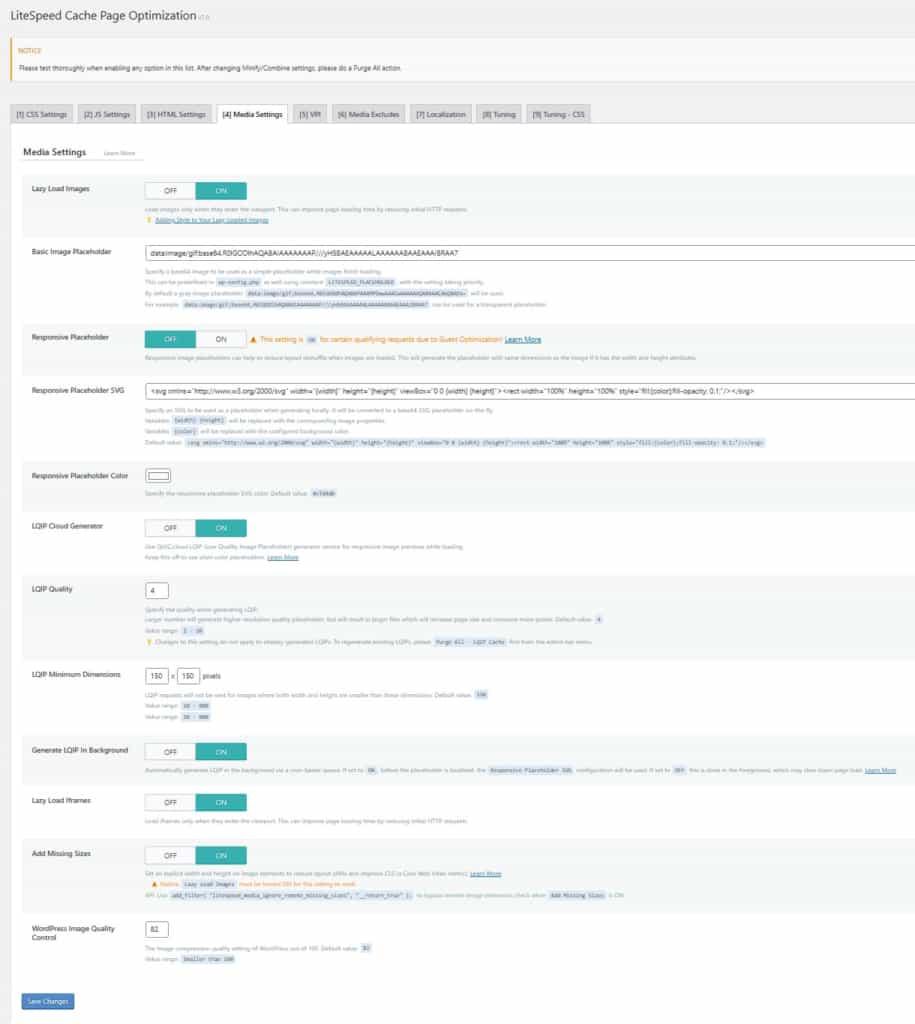
7d. Page Optimization: tab Media Settings
I use the following MEDIA SETTINGS:
- Lazy Load Images: ON
- Basic Image Placeholder: use the following text (as suggested by plugin) to give a transparent placeholder, which is what I want to reduce CLS:
- data:image/gif;base64,R0lGODlhAQABAIAAAAAAAP///yH5BAEAAAAALAAAAAABAAEAAAIBRAA7
- Responsive Placeholder: OFF (If ON, any image used must have ALT text populated)
- Responsive Placeholder SVG: default setting showing:
- vg xmlns=”http://www.w3.org/2000/svg” width=”{width}” height=”{height}” viewBox=”0 0 {width} {height}”><rect width=”100%” height=”100%” style=”fill:{color};fill-opacity: 0.1;”/></svg>
- Responsive Placeholder Color: Mine is RGB=255,255,255. It should match the RGB of the pages/posts background color.
- LQIP Cloud Generator: ON
- LQIP Quality (higher nbr is higher quality but lower perf): 4 (default is 4)
- LQIP Minimum Dimensions: 150×150 (same as default)
- Generate LQIP in Background: ON
- Lazy Load Iframes: ON
- Add Missing Sizes (only works if Lazy Loading is On): ON
- WordPress Image Quality Control: 82
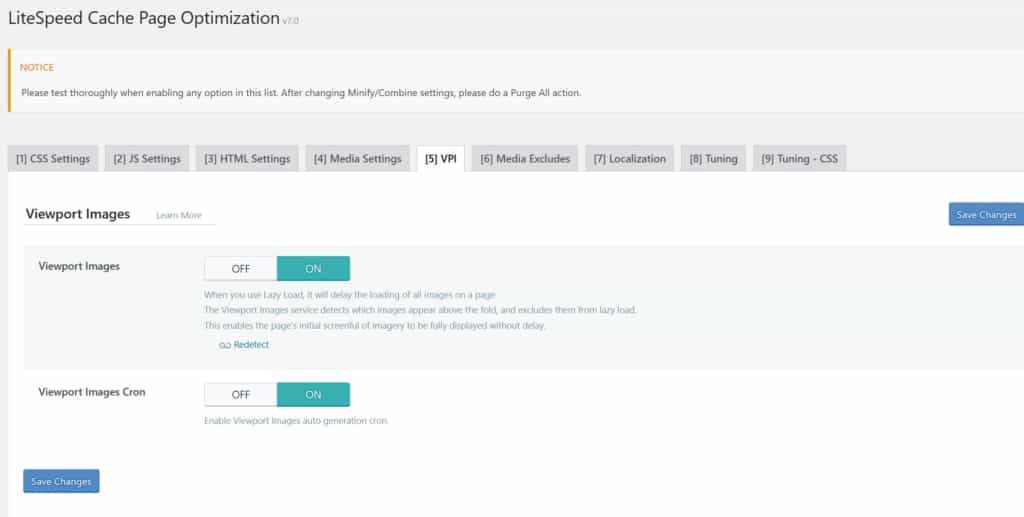
7e. Page Optimization: tab VPI
These settings will populate WP settings to point to images located in a viewport for each individual page or post. It’s believed to avoid lazy loading of those images and to also cache them specifically, e.g., page/post header logo image, featured image, etc. for each individual post/page. Also, note there is a separate desktop and mobile VPI list of images that will populate. It only populates this WP setting (per post/page) after about 5-10 minutes upon publishing.
Important: The VPI image filenames do NOT update in the WP setting of each post/page when a viewport image changes, e.g., changing the featured image filename. It’s unknown if that’s by design. So, a manual change is used in WP in this VPI settings area.
I use the following VPI config:
- Viewport Images (requires lazy load): ON
- Viewport Images Cron: ON
7f. Page Optimization: tab Media Excludes
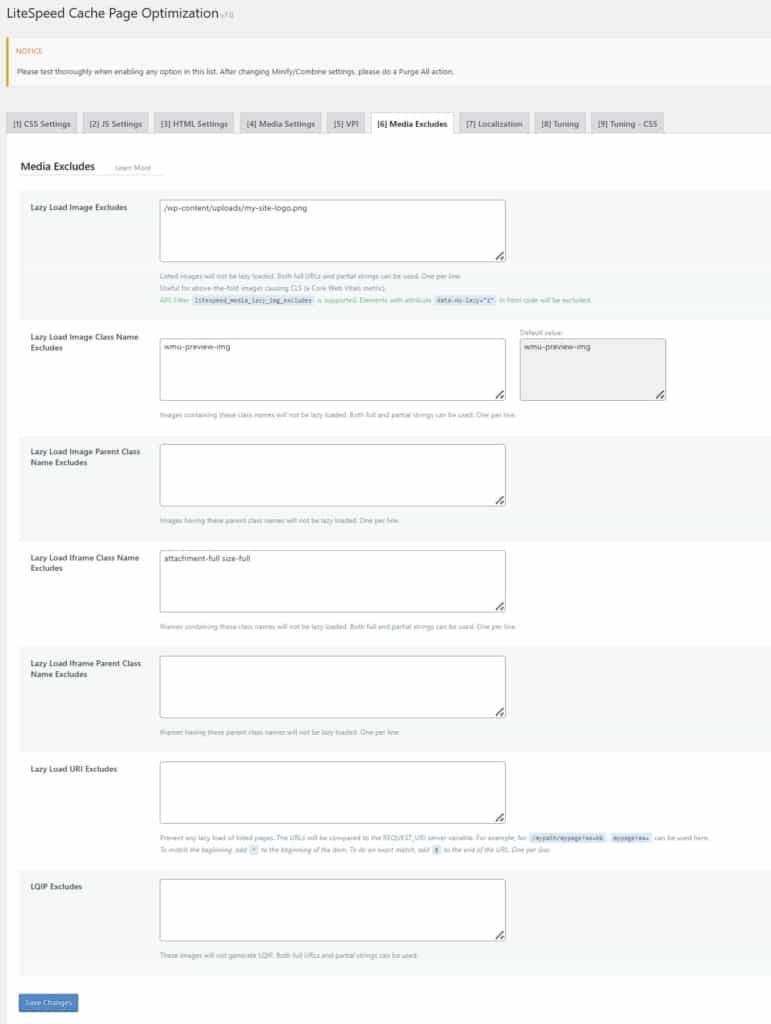
I use the following MEDIA EXCLUDES config:
- Lazy Load Image Excludes: /wp-content/uploads/my-site-logo.png
- These items should include any relative paths to logos used in header. Also, if you use a separate logo for mobile (I don’t use), you’ll have 2 logo paths.
- Lazy Load Image Class Name Excludes: wmu-preview-img (default)
- Lazy Load Image Parent Class Name Excludes: empty
- Lazy Load Iframe Class Name Excludes: attachment-full size-full
- Lazy Load Iframe Parent Class Name Excludes: empty
- Lazy Load URI Excludes: empty
- LQIP Excludes: empty
7g. Page Optimization: tab Localization
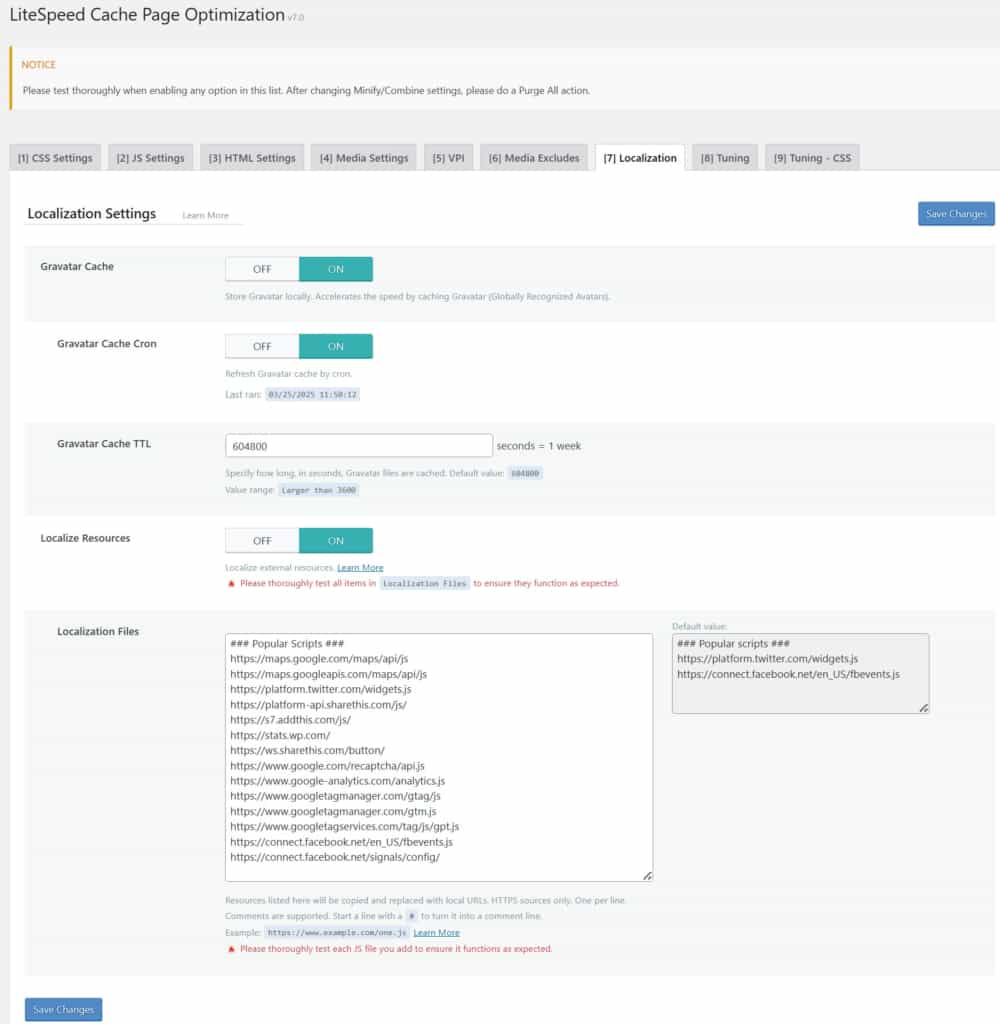
I use the following LOCALIZATION config:
- Gravatar Cache: ON
- Gravatar Cache Cron: ON
- Gravatar Cache TTL: 604800
- Localize Resources: ON (select OFF if there are no Localization File paths listed)
- Localization Files:
- Also, Media Masters says: view third-party JavaScript loading on your site (you can do this in Chrome Dev Tools, PageSpeed Insights, etc). Then add their JavaScript file. See the list below, but make sure you test them carefully to make sure everything is working correctly. You may also want to go through support forums to see common issues with localization for LiteSpeed.
- If using Google Analytics, ensure this line exists: https://google-analytics.com/analytics.js
7h. Page Optimization: tab Tuning
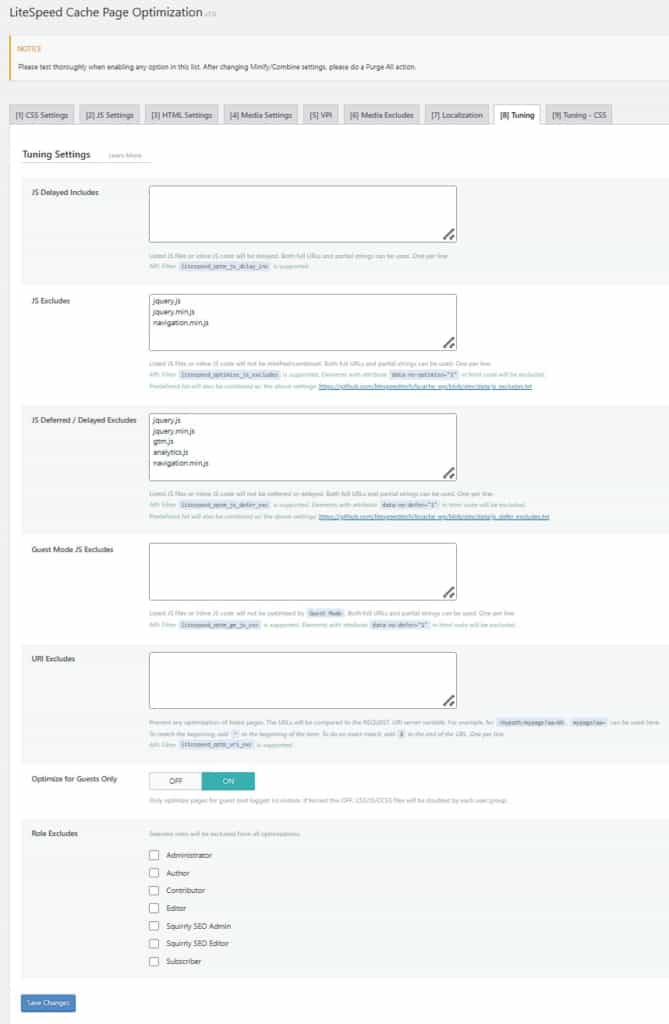
This is partly JS Tuning. I use the following TUNING config:
- JS Delayed Includes: empty
- JS Excludes:
- jquery.js
- jquery.min.js
- navigation.min.js
- JS Deferred / Delayed Excludes:
- jquery.js
- jquery.min.js
- gtm.js
- analytics.js
- navigation.min.js
- Guest Mode JS Excludes: empty
- URI Excludes: empty
- Optimize for Guests Only: ON
- Role Excludes: none selected
For further reading on JS, see LiteSpeed’s “Troubleshooting CSS/JS Issues“.
7i. Page Optimization: tab Tuning CSS
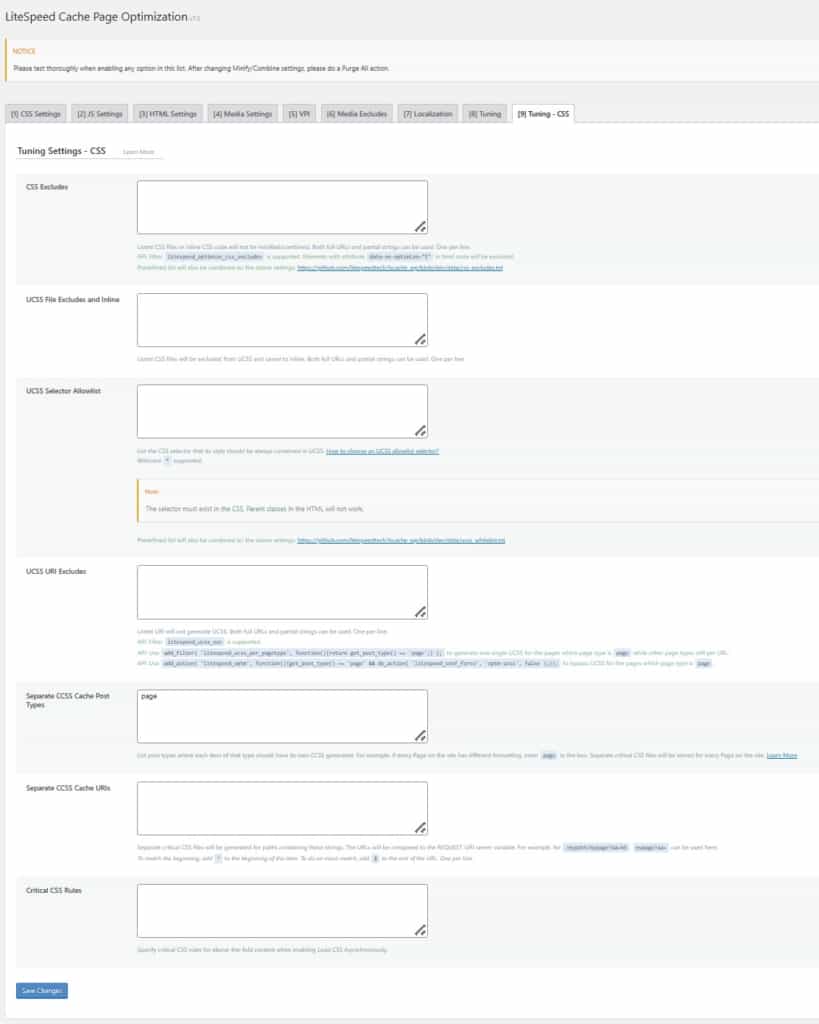
I use the following TUNING CSS config:
- CSS Excludes: empty
- UCSS File Excludes and Inline: empty
- UCSS Selector Allowlist: empty
- UCSS URI Excludes: empty
- Separate CCSS Cache Post Types:
- page
- Separate CCSS Cache URIs: empty
- Critical CSS Rules: empty
For further reading on CSS, see LiteSpeed’s “Troubleshooting CSS/JS Issues“.
8. Database Section
The Database section has the following tabs:
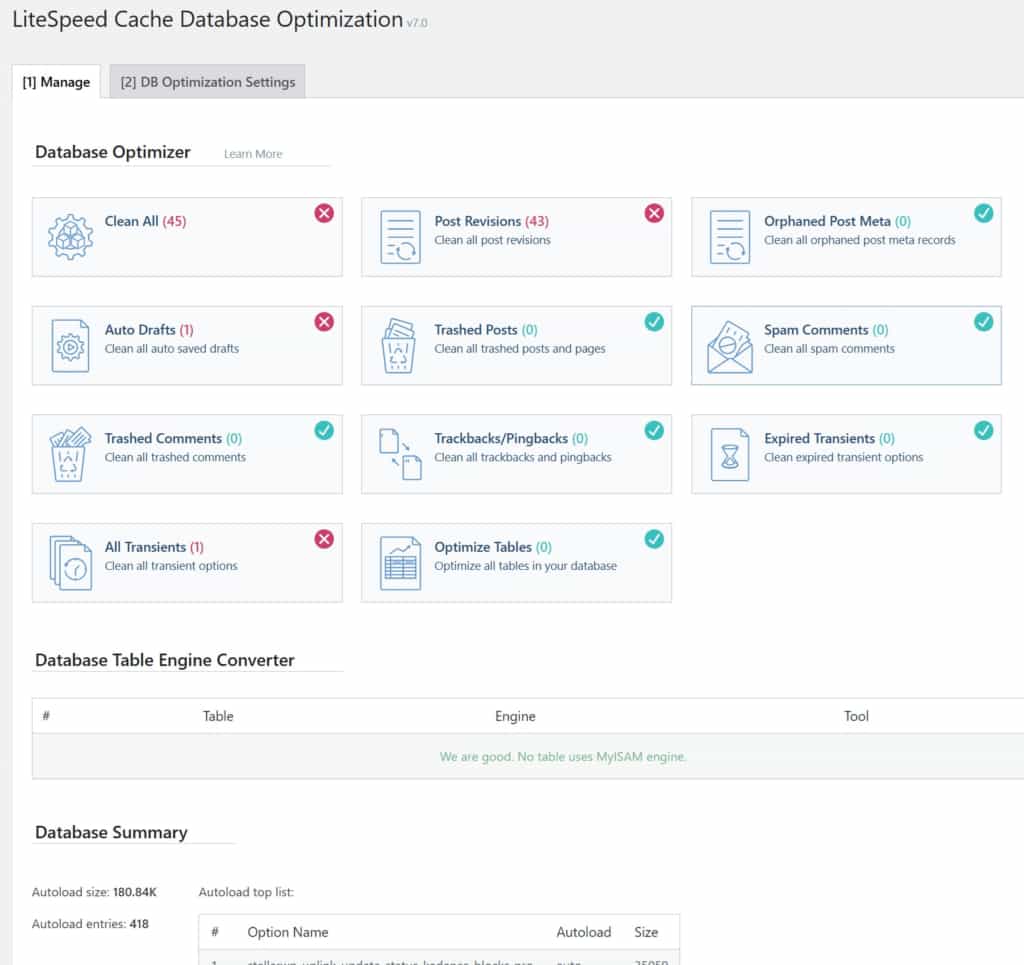
8a. Database: tab Manage
Tapping any of these MANAGE functions will clean or optimize the referenced portion(s) of the database.
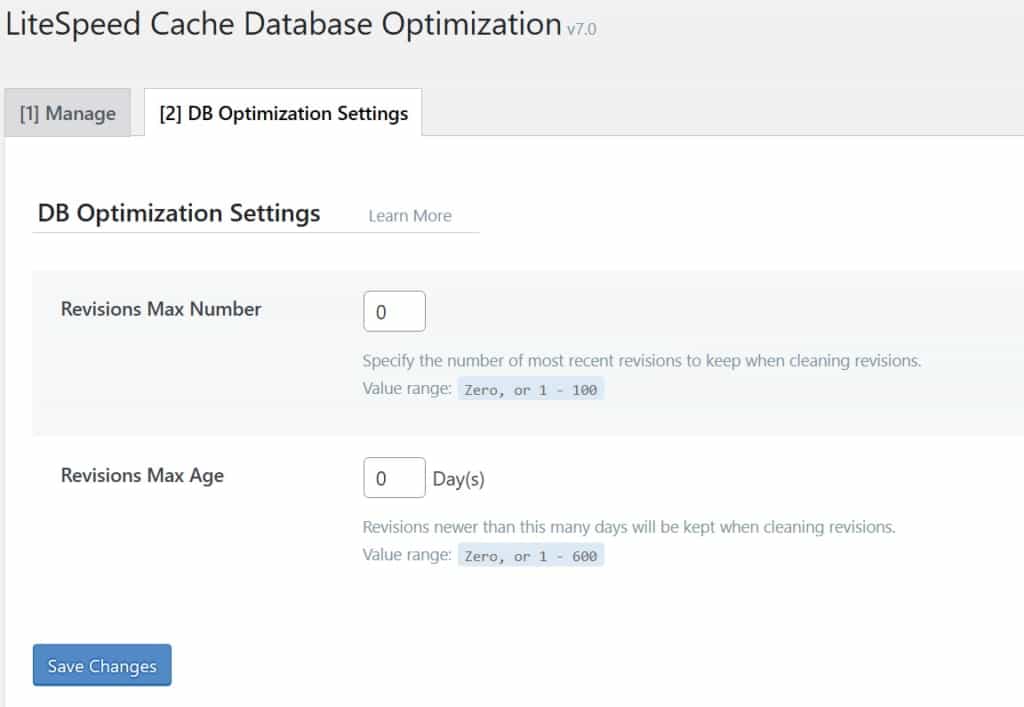
8b. Database: tab DB Optimization Settings
While you might want to use values here, I forego them. I use the following DB OPTIMIZATION SETTINGS:
- Revisions Max Number: 0
- Revisions Max Age: 0
9. Crawler Section
The Crawler section, in 2025, has switched some items around. They’re now these tabs:
For more knowledge on handling crawlers, see LiteSpeed’s “Crawler Issues & Troubleshooting“.
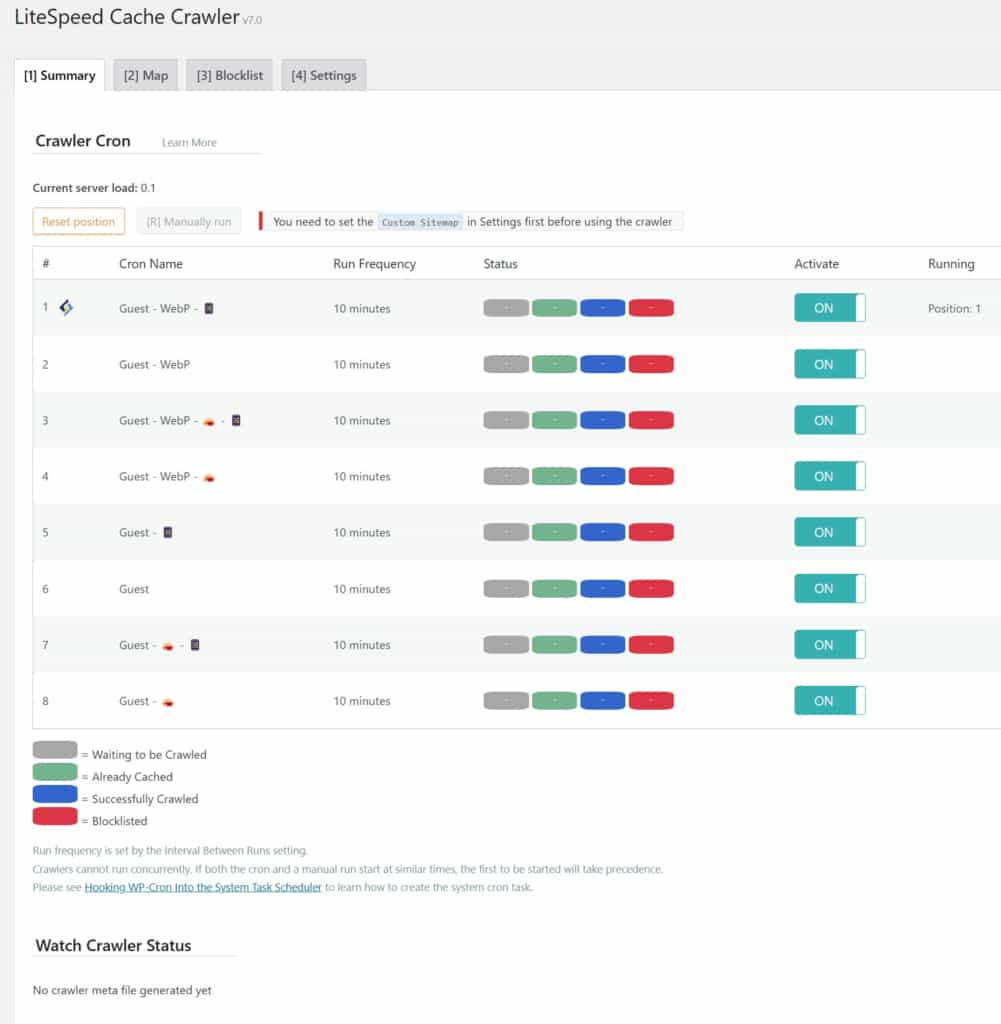
9a. Crawler: tab Summary
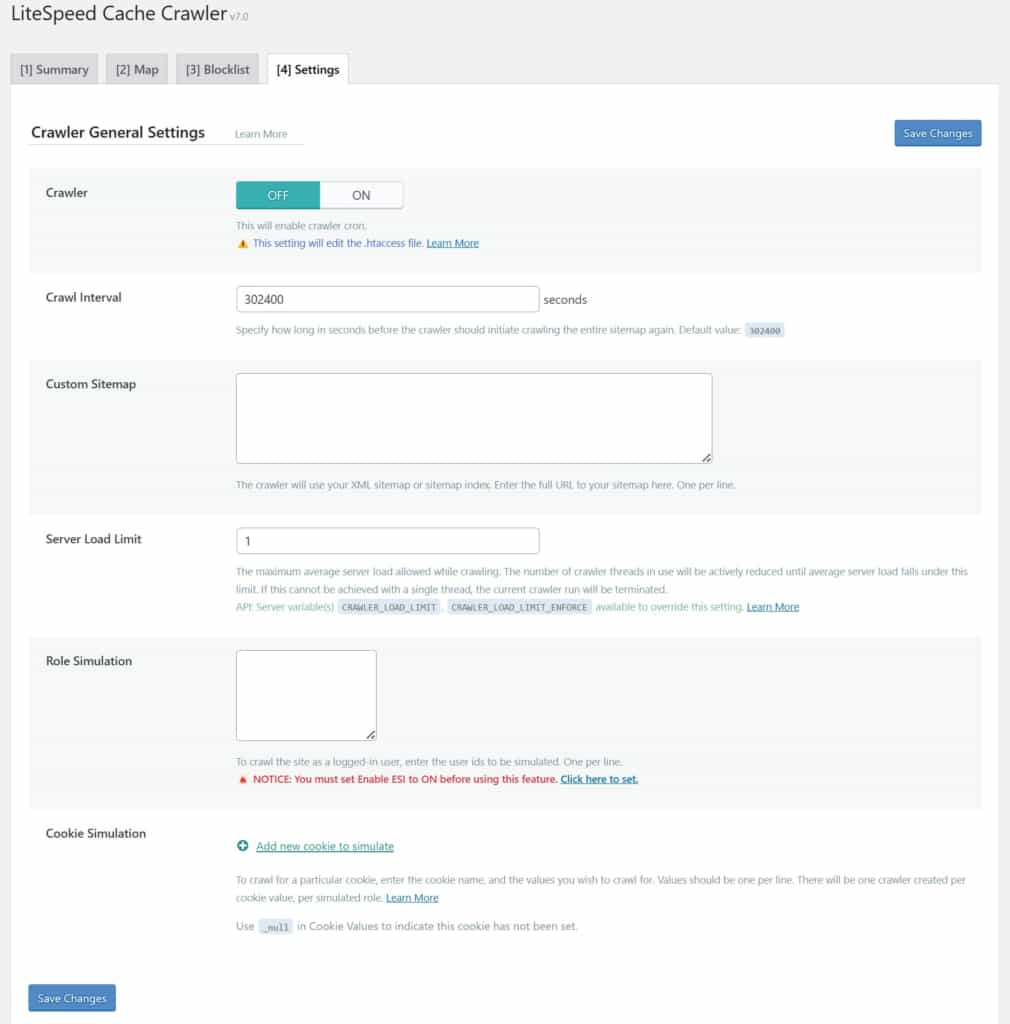
I used crawlers before and found I currently don’t need them. The screens are here for your review and consideration. In the meantime, I do leave the default settings of all the crawler settings are shown as being active; however, they don’t actually do anything because I don’t have them activated on the server.
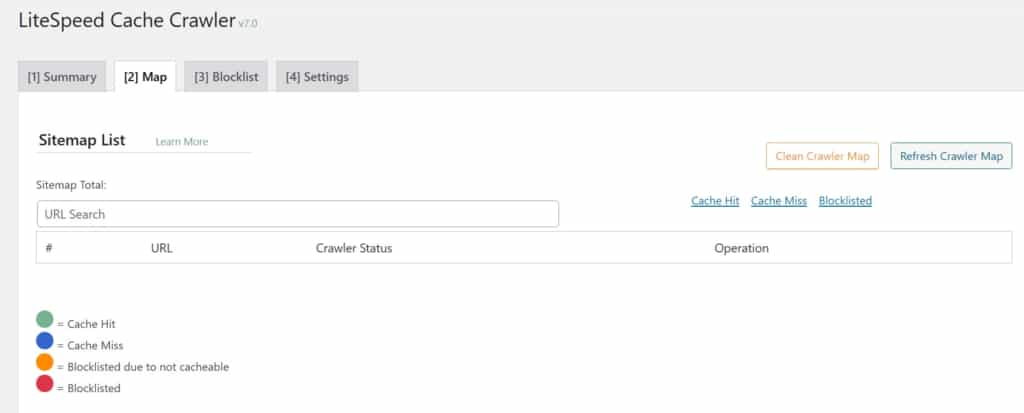
9b. Crawler: tab Map
This MAP section reveals sitemap crawled status but only if you use the LiteSpeed crawlers.
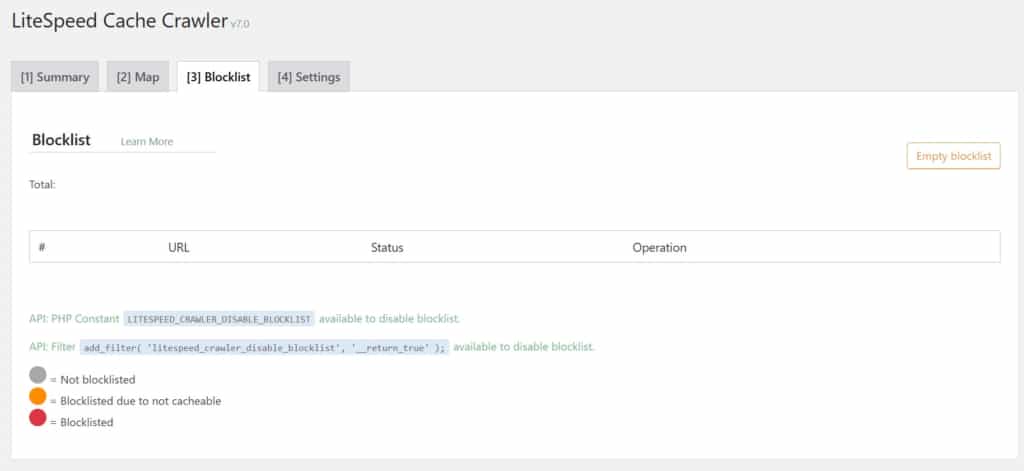
9c. Crawler: tab Blocklist
This BLOCKLIST area basically will show you any areas that are blocked from being cached. Again, this is only feedback received if you use LiteSpeed crawlers.
9d. Crawler: tab Settings
I use the following crawler general SETTINGS. The default “Crawler” is OFF and I don’t enable it because I currently don’t use crawlers.
10. Toolbox Section
The Toolbox section has the following tabs:
10a. Toolbox: tab Purge
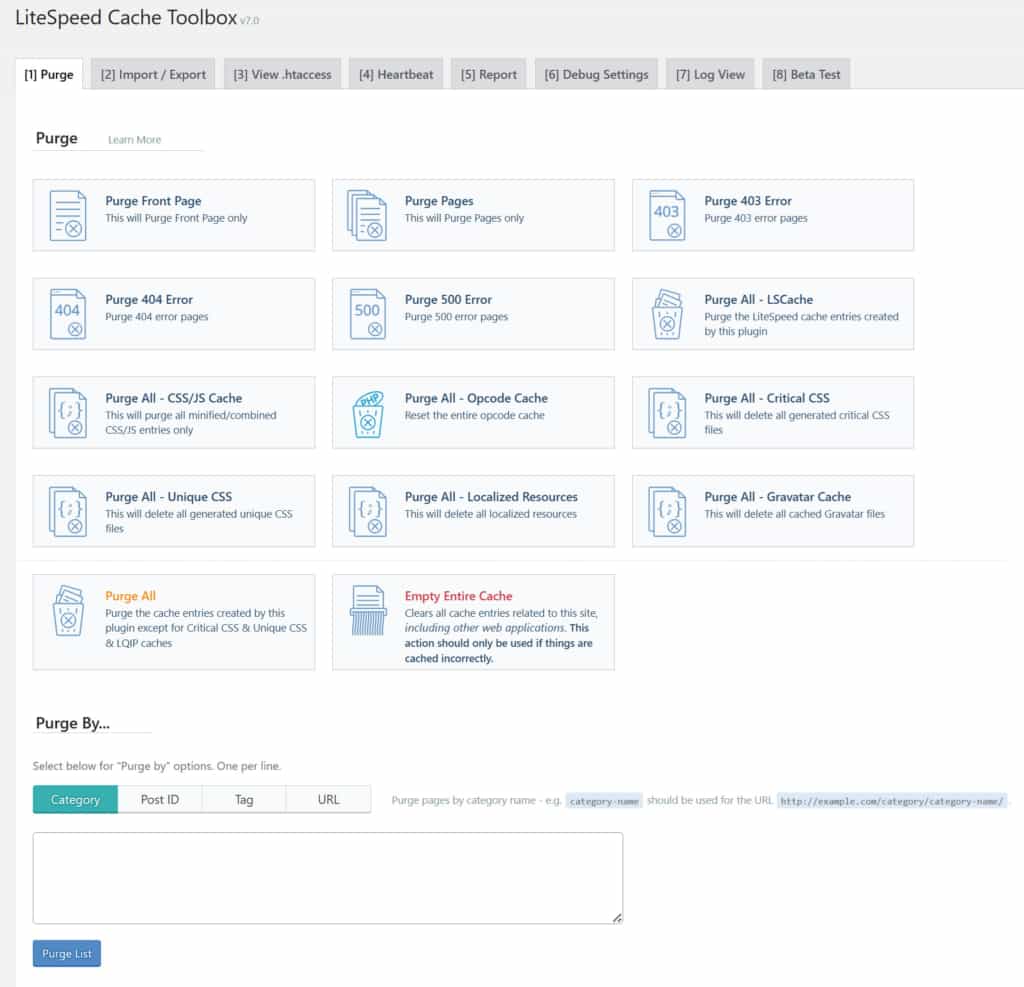
These are specific PURGE functions related to caching or areas specifically named. Note that these are different from the Database section to “Manage” Database Optimizer functions.
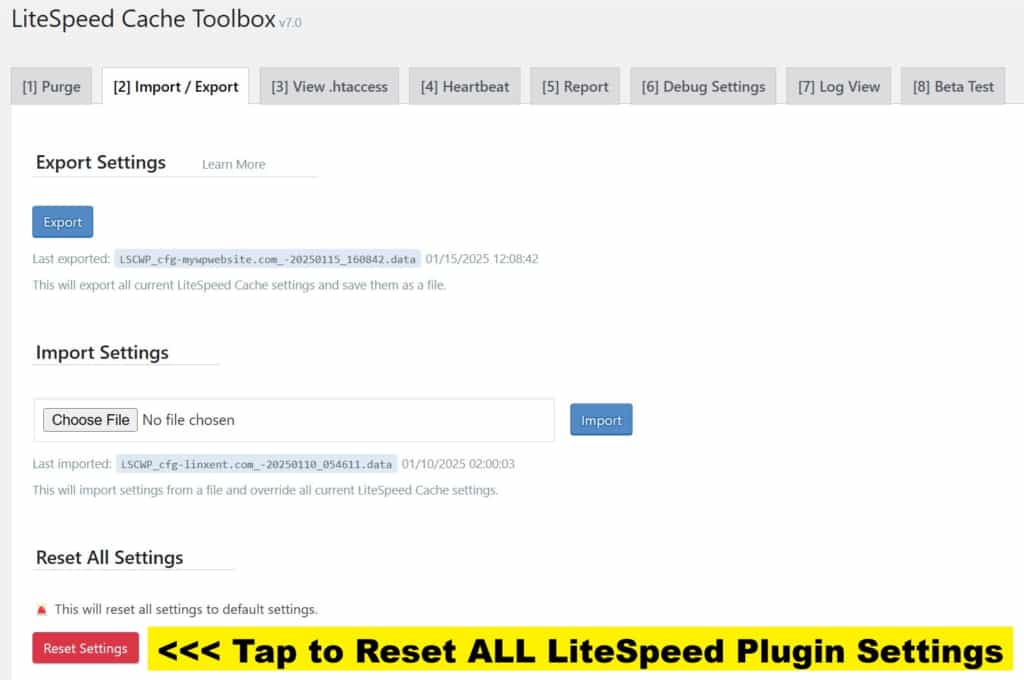
10b. Toolbox: tab Import Export
Here you can tap <Export> to generate a file to save your lscwp plugin settings locally. To replace current settings, just tap <Choose File> and point it to your locally saved settings you previously exported. Then, assign them by tapping <Import> to replace your current settings.
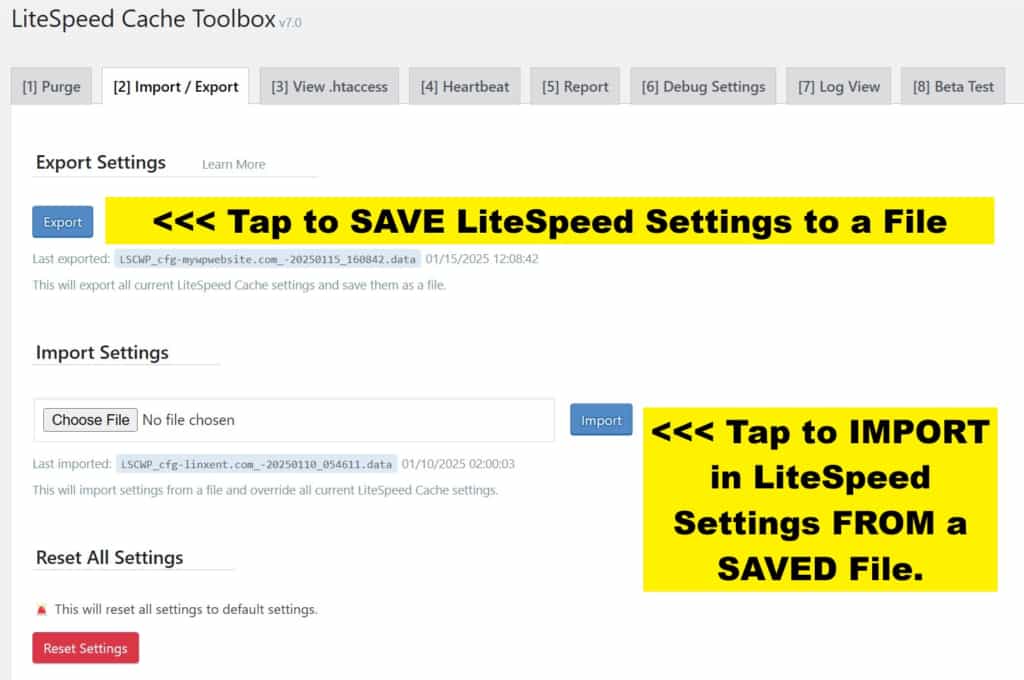
Also, if you want to start all over with settings and change it back to when you first installed the LiteSpeed plugin, tap the red <Reset Settings> button. However, I always recommend exporting the current settings before ever applying this function.
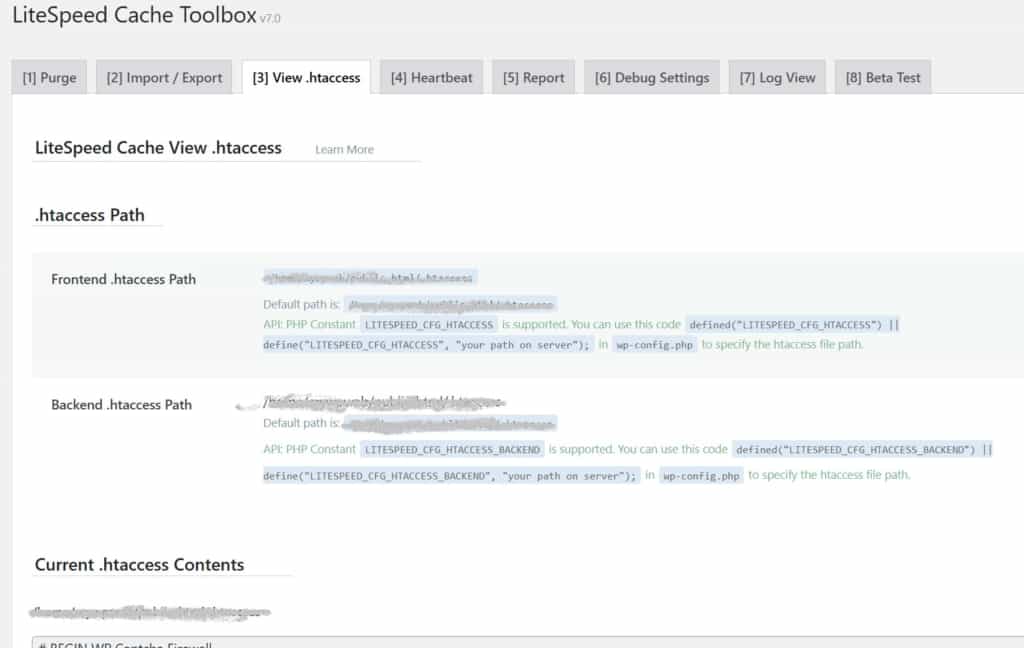
10c. Toolbox: tab View .htaccess
This is a great screen to show you what’s currently in the “.htaccess” file used by your site. It also gives you its file path locations on the web server for both its frontend and backend.
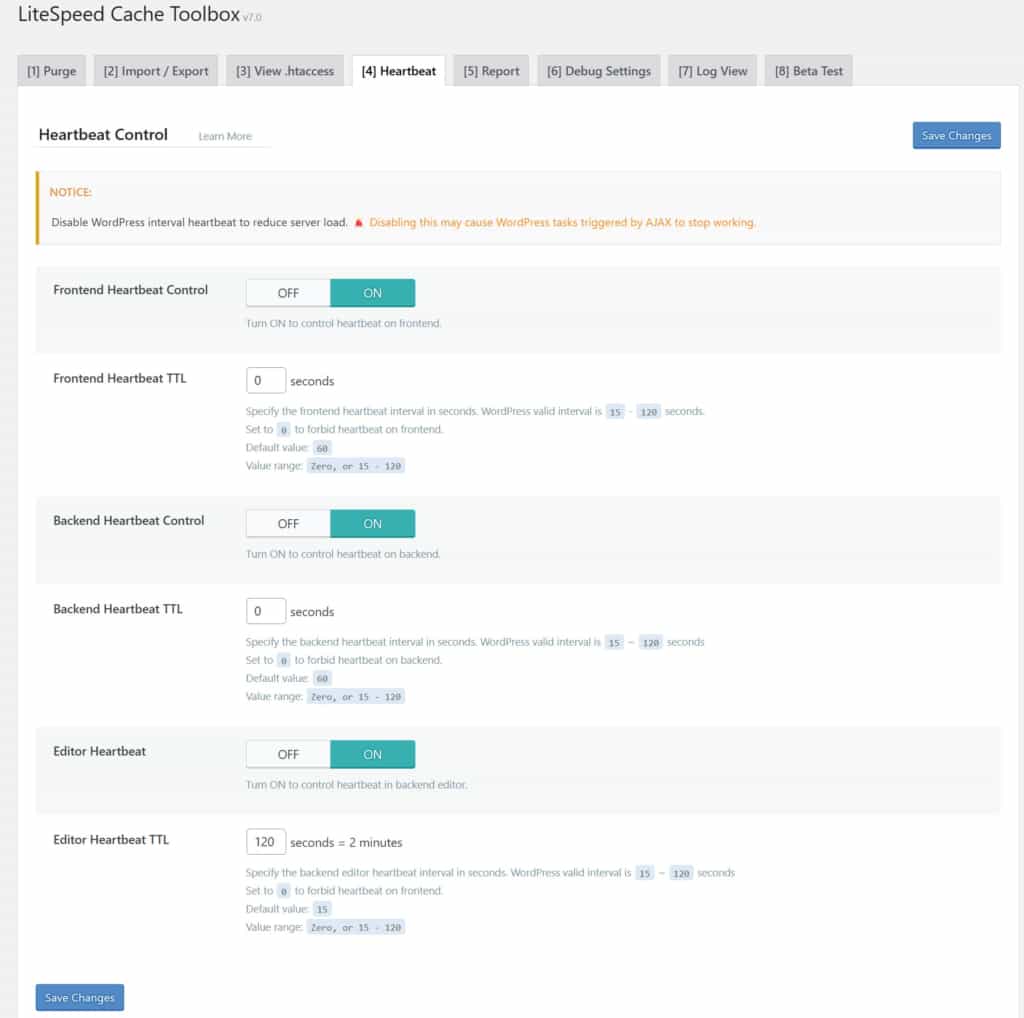
10d. Toolbox: tab Heartbeat
I use the following HEARTBEAT config:
- Frontend Heartbeat Control: ON
- If using OFF, it might break AJAX triggers to not work.
- Frontend Heartbeat TTL: 0
- Backend Heartbeat Control: ON
- Backend Heartbeat TTL: 0
- Editor Heartbeat: ON
- Editor Heartbeat TTL: 120
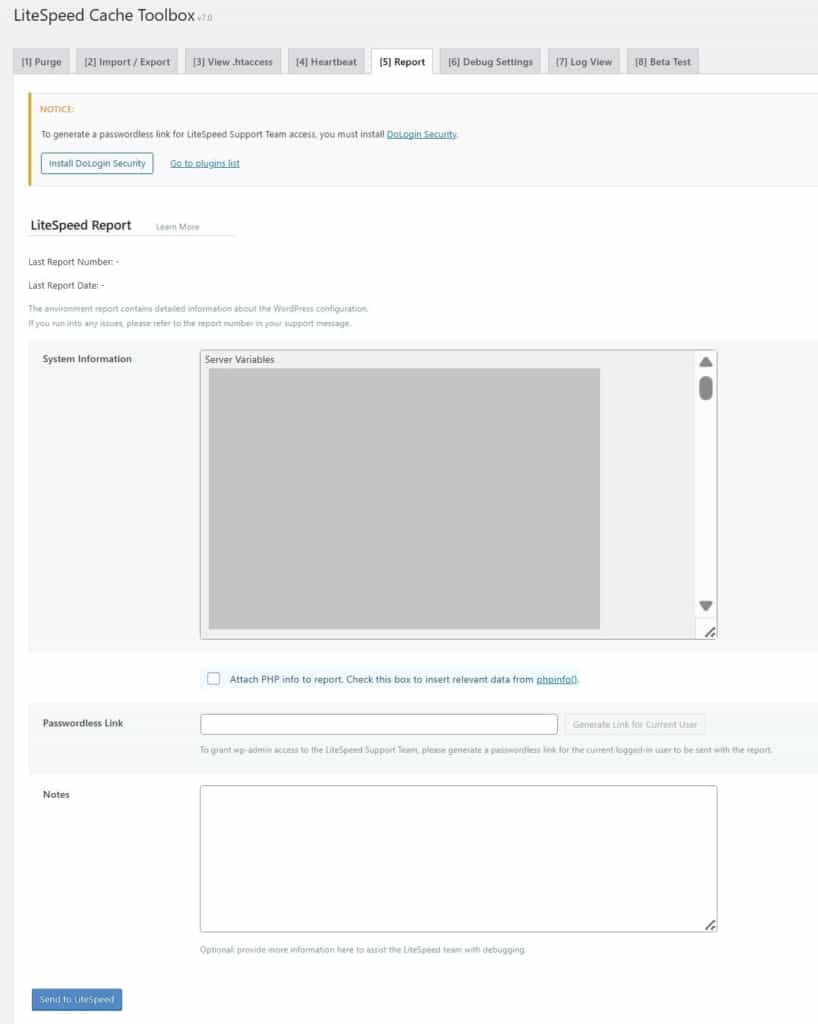
10e. Toolbox: tab Report
I use the following REPORT config: no changes
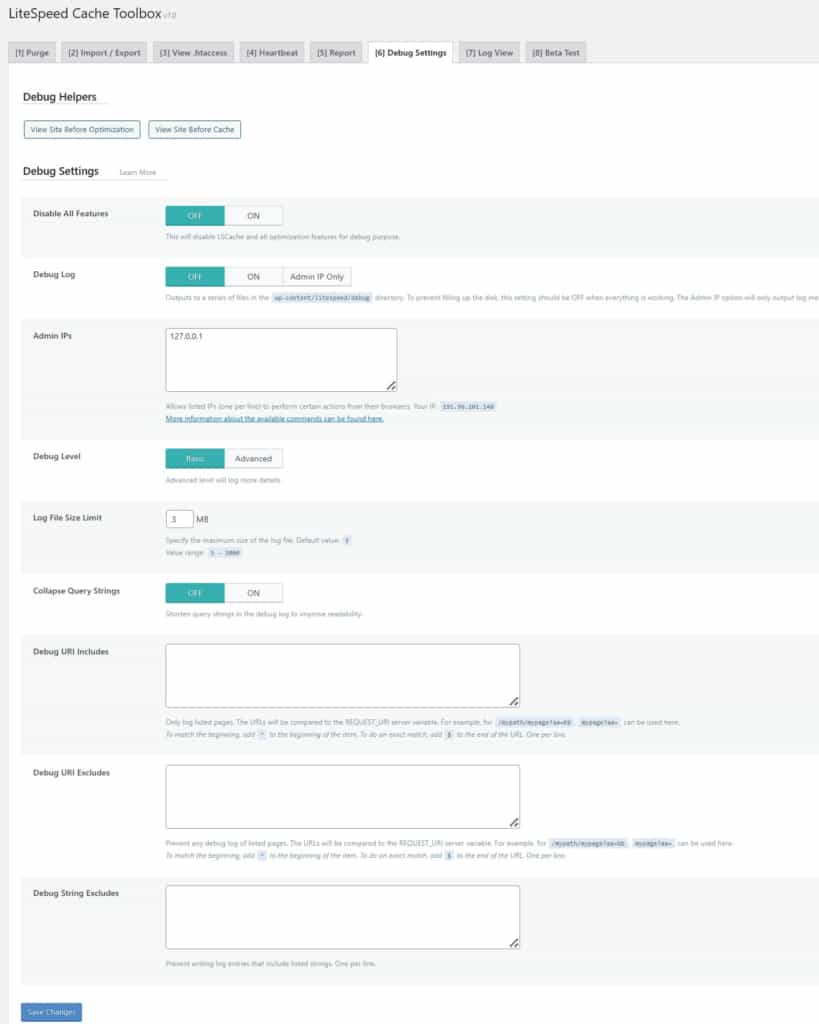
10f. Toolbox: tab Debug Settings
This is only used during debugging or testing restricting LiteSpeed. I use the following DEBUG SETTINGS:
- Disable All Features: OFF
- Debug Log: OFF
- Admin IPs: 127.0.0.1 (default)
- Debug Level: Basic
- Log File Size Limit: 3 MB
- Collapse Query Strings: OFF
- Debug URI Includes: empty
- Debug URI Excludes: empty
- Debug String Excludes: empty
10g. Toolbox: tab Log View
This provides a good selection of log types to review:
- Debug Log
- Purge Log
- Crawler Log
And, there’s a final feature to dump them all when you tap to <Clear Logs>.

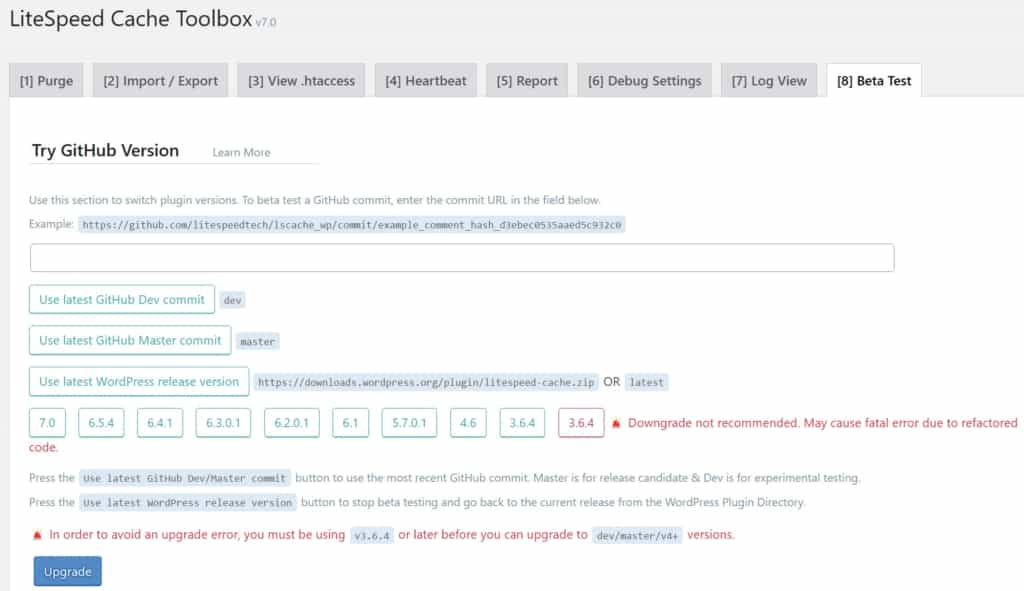
10h. Toolbox: tab Beta Test
This specialized tab is just to BETA TEST certain changes. I never use this function without working with a higher level expert such as a support technician. Also, I backup my entire site or domain server before using.
Initial Notes If Using LiteSpeed Server
- Ensure your php version on the server meets the minimum LiteSpeed requirement.
- Options regarding the .htaccess file:
- You can have more options if you make the .htaccess file to be writable, instead of read only. If it’s not, you can still download it, change the property and then upload it back. Then, it remains as being writable.
- If you have access to the LiteSpeed Server settings directly, on its section named like “HT Access”, select all options, except the one named “None”. This gives .htaccess file write privileges to the server. With that setting, the LSCache plugin now has some settings that will be able to update the .htaccess file.
- Avoid making the .htaccess file writeable if you’re unsure of possible security concerns.
LiteSpeed Resources
- List of Common Issues & Solutions (LiteSpeed site)
- LSCWP Plugin Support Forum
- LiteSpeed’s Guide to Setting Up CDN
- Toptal.com: Highly trusted and respected for hiring engineers for help
- OnLineMediaMasters Ideal LiteSpeed Cache Settings
- PerfMatters Best Settings for Perfmatters and LiteSpeed Cache
Conclusion
Now you’ve seen this tremendously long series of LiteSpeed cache plugin settings that I use on my WordPress sites. I generally achieve easy high 90s to 100 values in PSI metrics. Also, you’ve seen my notes of what settings are changed if you happen to have a recipe site that uses “WP Recipe Maker”.
Finally, you’ve seen the provided links to extremely valuable resources for further documentation from LiteSpeed or from outstanding LiteSpeed experts. So, be sure and share your successful experiences in the comments and what settings you’ve changed for better results. Finally, share this post on social media and forums to help others!

