There are 3 easy ways on how to install WordPress from cPanel. See the fast 1 click WordPress install method, the custom method with full options, or using the Softaculous method. All are shown with pics for each, easy step. Also, this is part of my “Setup WordPress Website” category for lots of related posts.
Introduction of How to Install WordPress from cPanel
There are several ways to install WordPress in cPanel. So, for any method, they all start after you logon to cPanel.

Then, choose a method you want to use to install WordPress. I include all popular methods and steps with pics and notes for each step. Also, just tap the link below to quickly jump to look over the method you want.
- Method 1: Fastest 1 Click WordPress install that automatically uses all default settings.
- Method 2: Easy Install WordPress in cPanel with full options to change any default settings.
- Method 3: Install WordPress using Softaculous (my separate article for those who have and want to use Softaculous).
Method 1: Fast 1 Click WordPress Install via cPanel
What is 1 Click WordPress?
The 1 Click WordPress install is the fastest known way to install WordPress. It’s a matter of locating the button to tap for your selected domain. All the options and settings are predetermined and set for you. It’s completely installed and active in about 15-30 seconds. It’s perfect for beginners and it’s great for experts who need a quick site installed to perform some testing.
Step 1. How to Perform 1 Click WordPress Install in cPanel
After logging in to cPanel, on the left panel, tap <WordPress Management>.

Then, tap the button <Install WordPress>. This will take you to the 1 click install screen.

Then, skip changing any revealed settings and tap <Install> button to accomplish your one click installation of WordPress.

Step 2. After 1-Click Method is Done: Immediate Needs
Finally, after applying this 1-click method, your default website is fully installed and active. To address some immediate security checks and other initial discoveries needing attention, go to the final important steps immediately after installing WordPress.
For an alternate read, see “How to Install WordPress with One-Click” by wewp.io.
Method 2: Install WordPress from cPanel with Full Options
This is the strongest installation method and allows you to change the highest amount of prepopulated, default settings, as desired. Yet, the steps to actually install are very simple. Here are those steps.
Keep in mind that not all web hosts stay current on their WordPress install steps. Here’s a2hosting’s version of “How to install WordPress using the cPanel WordPress Toolkit“. Fortunately, my host iWebFusion.net keeps their cPanel licenses, servers, and clients current so I’m able to show you the improved cPanel installation steps with full pics.
Step 1. Start to Install WordPress from cPanel
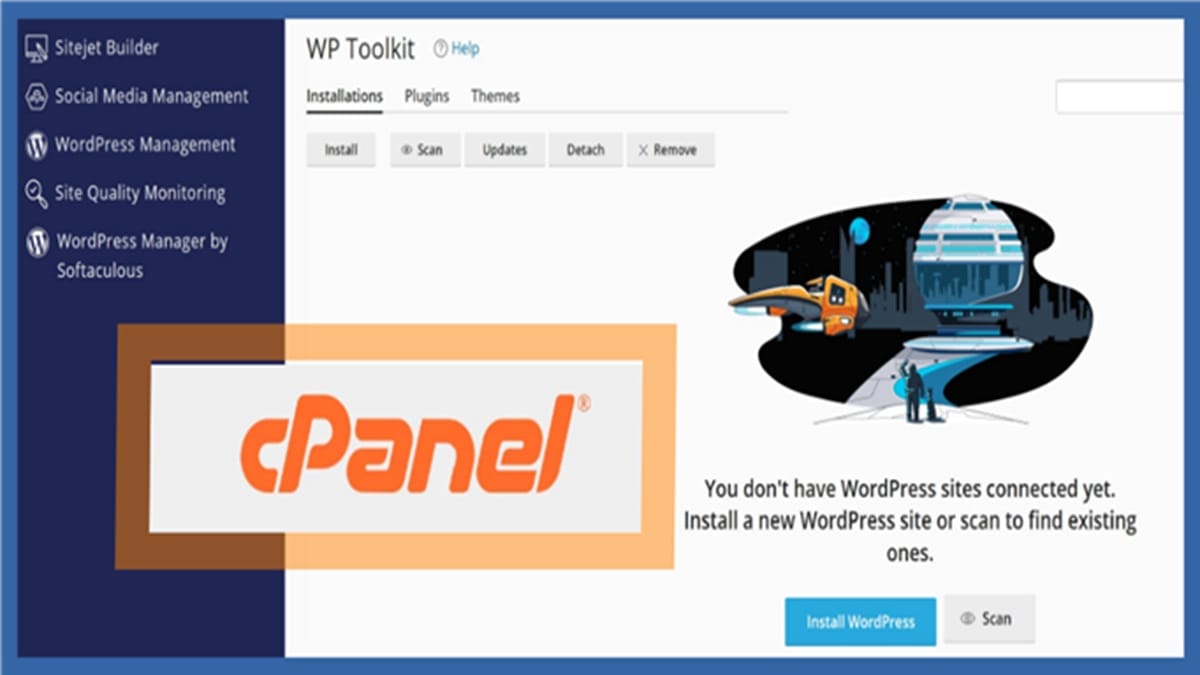
After logging on to cPanel, you tap “WordPress Management”. It’s located on the left pane and also, if you scroll down the right main pane, it’s in the “Domains” section. Tap either one.

Step 2. WP Toolkit: Tap Install WordPress or After a Scan
Tapping “WordPress Management” brings you to the WP Toolkit with several options. Initially, you’re in the “Installations” section of the WP Toolkit. For QC (quality control), I always tap to run a <Scan> first. It checks to ensure I don’t already have an old WordPress website installed that I forgot about. If there is, I can just delete it.
Then, I tap <Install WordPress>.

Step 3. General Settings & WordPress Administrator Settings
After tapping to install WordPress, the full settings options appear. So, start to first focus on the GENERAL Settings. It’s here you can change any of the available options. I never change anything here except the “Website title”. I can always change it later easily after the WordPress website is installed but I like to get it here since it’s now available.
Next, I do change the WordPress Administrator Settings. I’ll use my own naming conventions for the Username and I’ll fill in my own password I prefer. Finally, I definitely change the email address. It’s best to use an email address using this domain name but, you can always change it later if you don’t have domain mail setup yet.
Don’t install yet. Continue to see the other remaining options to set first.

Step 4. WordPress Database Settings
This section is where you perform the WordPress Database Setup and where you create the admin user in the WordPress Database. Tap to expand “Database” and reveal its prepopulated settings.
Then, decide your own naming conventions to use for WordPress databases and tables. Make the database name and table prefix as short as possible. Also, neither one has to start with “wp_”. This is very helpful for down the road when you learn more and perform cleanups, speed improvements, and migrations. There are also future plugins or tools you might use and being able to identify database names and especially table names will prove a firm necessity.
Here’s a good, short article on “How to Name Your WordPress Database” from WP Services.
Also, document to store WordPress Database Setup settings. And store settings used to create admin user in WordPress database.
Below are shown some default settings that are allowed to be changed which I always change all of them. For security reasons, ensure you don’t post your naming convention methods uses.

Step 5. Automatic Update Settings
Tap to expand the “Automatic Update Settings” section. Then, review the settings and decide if you want to change any of them. To make this an easier decision, below are 2 revealing screen captures.
The first pic shows the default automatic update settings. The 2nd one shows the initial automatic update settings I use for nearly every WordPress installation from cPanel. Overall, I don’t want automatic updates applied initially. This permits me to review any unique functions of a site I might have after any update is about to be applied. Over time, I’ll allow specific items to auto update.


Step 6. Installing WordPress and Initial Dashboard settings
Next, after all your settings have become optionally customized to your preferences, you tap <Install> button. Then, there’s about a 15-30 seconds time for all processes to run and finish.

After WordPress has finished installing, a prompt might appear such as the following example. Overall, you may not want it to install any more extra plugins or other items at this stage. I recommend tapping <No, thanks> to continue.

Next, you’re taken to the WP Toolkit’s Dashboard for this new domain’s WordPress website. It will reveal any website aspects that are flagged for review and/or fixing. The next steps will address these after showing you the default installed website.

Step 7. After WordPress is Installed: Immediate Needs
Finally, after installing WordPress from cPanel, a basic website is installed and running.

However, in this example, there were some immediate initial discoveries and security concerns needing attention. Those were revealed in the WP Toolkit’s Dashboard earlier. So, go to the final stage that shows important steps immediately after installing WordPress.
Method 3: Install WordPress from cPanel using Softaculous
Although cPanel finally advanced enough in 2025 to become as user friendly as Softaculous, some prefer to use Softaculous as I have in the past. So, I do have a detailed article with full step-by-step instructions shown here: Install WordPress using Softaculous.
Very Important Steps After Installing WordPress in cPanel
Typically, due to various version changes, host differences for defaults, and other scenarios, you should now review the WP Toolkit’s identified website needs. They’re usually an easy to moderate skill level and there’s plenty of guidance available through its provided helpful links. Only after addressing these flagged discoveries, can you then move forward to website development.
Ready for Site Development
Now, after you’ve installed WordPress in cPanel, and addressed all post install steps and issues, what’s next? The proper idea would be to follow your initial Website Project Plan to setup your website. But, if you didn’t really have one, that’s okay too. Here are some ideas for your next steps for developing your active default site.
- Review my posts shown in the Setup WordPress Website category. This will cover some areas of a theme to use, layout settings, site designing, media and logo, and other related topics. Finally, part of the site setup process will also involve plugins being referenced. There are many plugins so, it has its own category.
- During the setup phase of your website, part of that will involve installing and configuring plugins that are mentioned. So, I’ve developed an entire category for just that. Look over my Recommended WordPress Plugins category. While you might not use all of them, it will give you some solid ideas of what types of plugins to consider.
- Next, for the whole purpose of having a website, there’s the category that covers Creating Website Content. This is where you’ll see ideas of how to write posts and articles. It also includes an actual Blog Post Checklist so you won’t forget some important steps during your content creation.
- Finally, while setting up and operating a WordPress site, there are the occasional needs of working with SEO, Security, and Maintenance & Support. So, all those categories are visited periodically for ensuring a stable, useful, and safe site.
Conclusion of Install WordPress from cPanel
Now you’ve seen how to install WordPress from cPanel using several ways. You saw the 1 click WordPress install and the method to install WP in cPanel with full options you can set. The steps were very easy to follow with a pic for each step along with expert notes. Each note mentioned if it was suggested to change the default setting or what it was for.
At the end, your website was actively running for the public and ready for any customizing in layout, design, and content. And those areas to cover after installation were also mentioned with specific links to good topic categories and posts.