How I Reset A WordPress Site
This is how I reset a WordPress site using this complete guide that is actively maintained. It covers a complete set of steps in 3 phases to fully reset WordPress to default status. This is part of my Website Maintenance and Support & WordPress Plugins categories. Also, after using the WP Reset plugin, you can follow my post “Rebuild WordPress Website“.
The 3 Phases of Performing a WP Reset of a WordPress Website
To reduce issues and save time, here is an overview of the phases involved when I use the WP Reset plugin.
- This first phase prepares all types of exports and saves. It’s the longest phase but it does list methods of saving all types of settings.
- The second phase applies the reset. It’s the quickest step and the most invasive.
- The final phase describes a thorough clean removal of the WP Reset plugin and its excess objects and data left behind.
If you need a website project guide, see my post “Website Project Plan“. It covers a full guide for creating a new site or rebuilding a site as a full project. Also, you might be resetting your site to make it more efficient before selecting or moving to another host. So, read my article on “Website Requirements” to aid in that selection.
Phase 1. Preparing For A WP Site Reset
This phase is to give you a lot of backups of settings, files, and notes along the way. The reason it’s a bit lengthy is because you’re not going to later perform a full restore from a site backup. You’ll empty it and add it back with cleaner, leaner methods.
Also, save any security settings you might have in place. For new planned security measures, consider to read my post “Complete Guide to Security of WordPress Sites“.
Perform a full site backup
Even though you won’t be doing a full site restore, this full site backup is a major precaution to have available if you discover you can’t fully reimport all sections of your site for any reason.

- Option 1: Use site’s WPvivid Backup plugin.
- Take and download a manual backup using WPvivid and name the comment: “00BeforeSiteReset“.
- Ensure manual backup quantities to retain are at least set to 6.
- Option 2: Use cPanel or WHM account backup.
- Remember, this is like a server’s domain backup. But, it also includes any subdomains too so, ensure no edits to any add-on domains are done during this entire backup and WP Resetting process.
- Save backups to secondary location.
- Save to cloud storage or download and save locally. That’s because if you need to roll it back using a restore, you’ll potentially lose prior backups from the local host server.
Save Important Settings
Saving individual sets of settings is how you’ll be able to later reimport your site in sections to keep it cleaner and leaner than before. Also, your plugins might be different or the same as a free version. Regardless, this will give you the idea behind saving available settings of each of your plugins. These are the ones I currently use.
Save Comment Settings
- From WP Admin, go to Settings | Discussion.
- Under “Disallowed Comment Keys”, copy-and-paste text list into a text file named “Disallowed Comment Keys.txt”. I save it locally at: Domain / 01 Backups / WordPress / Settings – Discussion – Disallowed Comment Keys.
Save Theme Settings
From WP Admin, go to “Appearance | Customize | Import/Export”. Proceed to follow the “Export” task.
Also, save the copyright text in the footer. Before copying, tap the small tab away from “Visual” to be “Text”. This will copy it to include any links and formatting. Save as a text file “copyright footer text for kadence”.txt.
Save Plugins’ Settings
Some of my sites will not use all these plugins so, I just go down this list and follow the tasks for those plugins that I have on the site I’m preparing to reset.
Also, for added info on current and past plugins, read my post “My WP Plugin List“. I list all the good or great plugins I’ve used in recent years. On that article, I show only the top plugins, even the ones that might not fit my needs today but were still very good.
- 301 Redirects Pro (aka WP 301 Redirects): From WP Admin, go to Settings | 301 Redirects.
- Under tab “Settings”, go to inner tab “Tools”. In “Export” section, tap <Download Export File>.
- Ad Inserter Pro: From WP Admin, go to Settings | Ad Inserter Pro.
- Tap the Configuration (cog wheel) icon.
- Tap the up/down arrow icon to reveal a down arrow icon. Tap the down arrow icon to export settings for all blocks and save as a text file.
- Admin and Site Enhancements Pro (ASE Pro): From WP Admin, go to Tools | Enhancements.
- On bottom right side of any screen, tap “Export | Import” URL. In “Export Settings” section, tap <Export ASE Settings>.
- Berqwp: If using this caching optimization plugin, manually document settings or take screenshots. This is my setup guide of the Berqwp plugin.
- Code Snippets Pro: From WP Admin, go to Snippets (not Code Snippets) | All Snippets.
- Under the tab “All Snippets”, select all of them. Then, in the “Bulk actions dropdown, select “Export”. Tap <Apply> to download the file.
- Important: Take notes of which snippets were enabled as “Active”. The reimport process doesn’t activate anything so you’ll need to know which ones to reactivate, if some of them were inactive.
- Content Views: From WP Admin, go to “Tools | Export”. Select option “Views” and tap <Download Export File>.
- Database Cleaner Pro: There is no backup of any settings nor assignments of any previous unknowns.
- Go Live Update Urls PRO: There are no backups of any settings but they are minimal, if any.
- Independent Analytics Pro: From WP Admin, go to Analytics | Settings.
- For Reports: Scroll down near the bottom to the section “Export Report Settings”. Tap to “Select all reports” and tap <Export Reports>.
- For Data Export Option 1: I use WPvivid and select options to backup just databases with a filter on tables using term “independent”. In the backup “comments”, I name it “IndependentAnalyticsTABLES“. For other backup options, I refer to this article “How to Migrate, Import, & Export your Data” from Independent Analytics.
- For Data Export Option 2: Scroll down near the bottom to the section “Export Data to CSV”. Tap each button to export its particular set of data.
- For Settings: There is no backup of settings. So, I refer to a text file of notes settings to restore, since there are very few.
- Kadence (theme, navigation, header, elements):
- From WP Admin, go to “Appearance | Customize | Import/Export”. Then proceed with Export task of Kadence theme settings.
- From WP Admin, go to “Tools | Export” and select these items to export: Kadence navigation, Kadence header, elements). I export them individually to prevent duplications on later importing.
- Redis Object Cache: There are no settings.
- Squirrly SEO:
- From WP Admin, go to “Squirrly SEO | Technical SEO | Import & Data | Backup Settings & SEO”.
- Even if all options aren’t used, perform each<Download Backup> option, including <Export as JSON>.
- Note that there is my post on “Squirrly SEO: Install & Setup” that also shows the backup location in the final setup phase.
- WordPress Importer: There are no settings.
- WP Force SSL Pro: There is no backup available of any settings.
- WPvivid Backup: From WP Admin, go to “WPvivid Plugin | Settings”. From tab “Backup”, scroll down half-way to section “Export/Import Settings”. Tap <Export> and save settings file.
- WP Recipe Maker (multiple plugins): Save based on following steps.
- From WP Admin, go to “WP Recipe Maker | Template Editor“. From “Manage Templates”, tap these: “Recipe Templates | (make a selection under “Your Own Templates)”. Then, tap <Export>. Now, paste what’s in memory into a text file and save it with the same name as the custom template. Repeat with remaining custom templates. Then, return to repeat the process using “Snippet Templates” & “Roundup Templates”.
- From WP Admin, go to “WP Recipe Maker | Settings”. There is no way to export WPRM settings. So, there is an option of taking notes as I scroll down to identify settings or I often will just take a screen shot, tap down 1 page, and repeat. It will be several dozen screenshots but saves typing.
- Backup of recipes is covered later in exporting content.
- Note: This covers what I use. It may not cover some other things that you might use.
Save Root Files
Using cPanel’s File Manager, I download any advertising or search engine related site files. Example files are ads.txt, Bing, or Yandex files. Although, fortunately, the reset plugin doesn’t seem to remove them. I copy them in case a future version does remove them.
Save Main Content: Recipes, Pages, Posts, Images
Now, I save each major segment of the site’s content. Here are the sets of steps I follow to export out pages, posts, images, etc.
Sites using WP Recipe Maker: Save Recipes and Related Data
For a WP Recipe Maker site, I backup these recipe related items in several ways. Some appear duplicated but that’s due to different ways of later saving actual posts that have recipes. Recipes are backed up via the “bulk edit export” process within the WPRM plugin.
From WP Admin, go to “WP Recipe Maker | Manage”.
- To make preparations, at the very top, tap on tab “Recipes”.
- Tap “- Change Columns”. Then, ensure <Bulk Edit> is selected.
- Finally, at the footer, change it to be “500 rows”.
- To start backups, tap “Filter” checkbox and ensure no specific filters are chosen.
- With all recipes now selected, from the top area, tap <Bulk Edit XXX Recipes…>. This is repeated several different times as follows:
- 1st download: Select action “Export Recipes” and option “Recipes only“. Tap <Bulk Edit XXX Recipes>. Save file locally.
- 2nd download: Select action “Export Recipes” and option “Recipes only” & “Include User Ratings“. Tap <Bulk Edit XXX Recipes>. Save file locally.
- 3rd download: Select action “Export Recipes” and option “Recipes with their parent post“. Tap <Bulk Edit XXX Recipes>. Save file locally.
- 4th download: Select action “Export Recipes” and option “Recipes with their parent post” & “Include User Ratings“. Tap <Bulk Edit XXX Recipes>. Save file locally.
- Follow above Bulk Edit process to download all WPRM items such as these that I use.
- Recipes (as shown above with multiple downloads with different options)
- Courses
- Cuisines
- Equipment
- Ingredients
- Keywords
Save Pages
- Option 1 (WPvivid): From WP Admin, go to menu item “WPvivid Plugin” | Export/Import Page. This option also saves the images, comments, and taxonomies.
- From the tab named “Export”, select the post type “Page“.
- Then, tap <Next Step>.
- From here, select an Author, instead of all authors. Then, tap <Show Pages>.
- Then, scroll down and populate textbox “Comment the export” with the author’s name (but no spaces).
- Then, just above the Commented area, select “export all pages” checkbox and tap <Export and Download> to save the file locally.
- Important: Don’t rename the export file.
- Repeat above steps with each author.
- Option 2 (WP): From WP Admin, go to menu item “Tools” | Export. Select option “Pages” (no other revealed optional filters) and tap <Download Export File>. This does not save images.
Save Posts
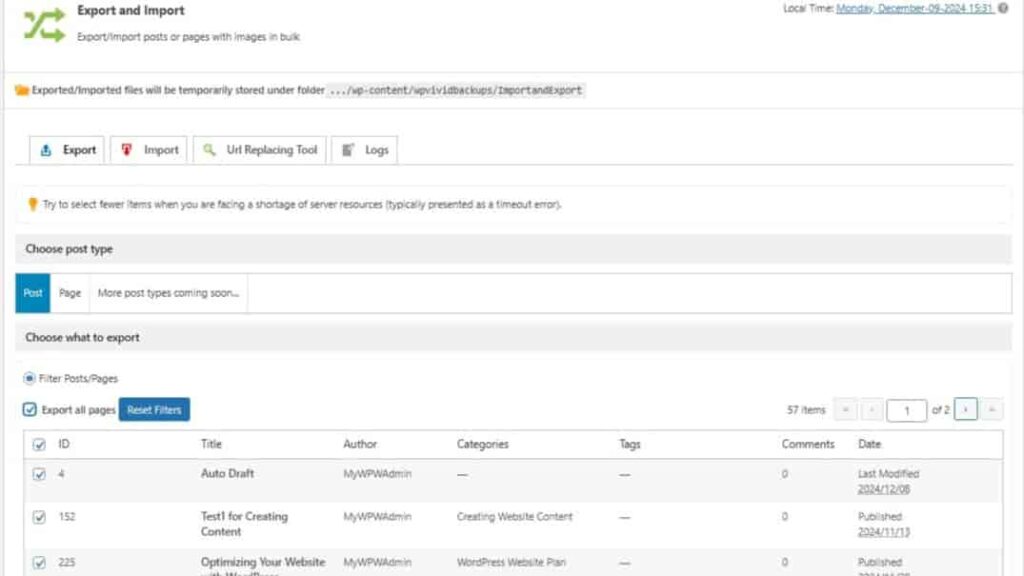
- Option 1 (WPvivid): From WP Admin, go to menu item “WPvivid Plugin” | Export/Import Page. This option also saves the images, comments, and taxonomies.
- From the tab named “Export”, select the post type “Post“.
- Then, tap <Next Step>.
- From here, select an Author, instead of all authors. Then, tap <Show Posts>.
- Then, scroll down and populate textbox “Comment the export” with the author’s name (but no spaces).
- Then, just above the Commented area, select “export all pages” checkbox and tap <Export and Download> to save the file locally.
- Important: Don’t rename the export file.
- Repeat above steps with each author.
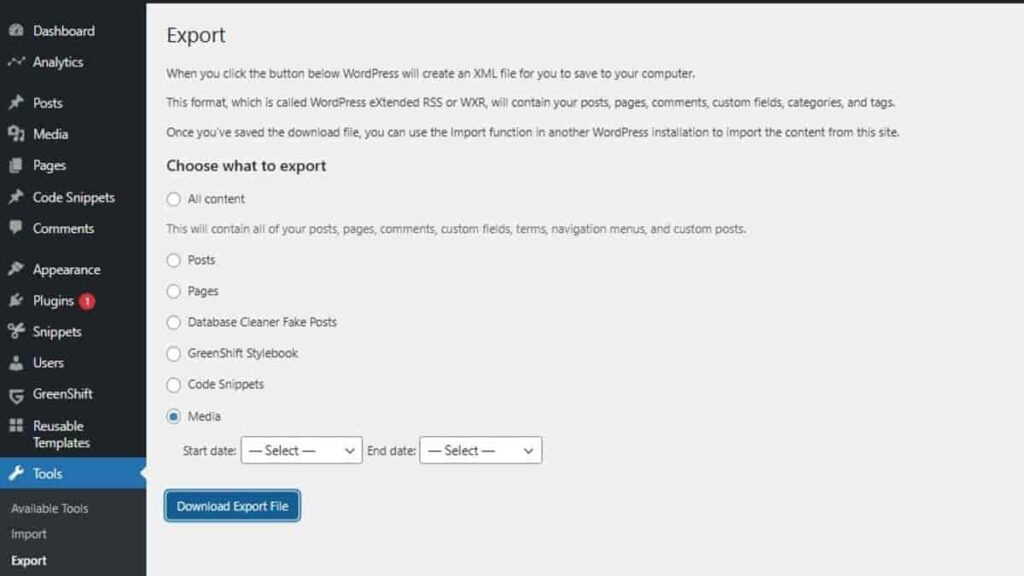
- Option 2: From WP Admin, go to menu item “Tools” | Export. Select option “Posts” (don’t select any other revealed optional filters) and tap <Download Export File>. This option does not save images. It only saves “pointers” to an image ID, if the image (with its ID) exists in the library.
Save Media
- Option 1: When you backup an entire site using WPvivid backup plugin, it contains individual folder backups for uploaded images. So, it’s good to have this for other media that doesn’t store with individual objects like posts or pages. Examples are site icon, site logo, and individual images that you might use for other aspects like for views.
- Option 2: I can use cPanel’s File Manager. Go to the sites folder root public_html folder | content | uploads. Then, compress that folder as a zip file and download it. Some of the other folders might contain other content.
- Option 3 (partial media): When I save posts and pages using WPvivid backup plugin, the related images are automatically included; however, it doesn’t include all the other site media.
- Option 4 (no media, media paths only: From WP Admin, go to menu item “Tools” | Export. Select option “Pages” (don’t select any other reveals optional filters) and tap <Download Export File>. This does not save images; it only saves the data records that associates an image ID with its correspond post ID, page ID, etc.
Phase 2. Performing a WP Site Reset
- Install WP Reset plugin: “WP Reset Pro”.
- Review plugin options thoroughly to confirm if you really want to reset WordPress to default.
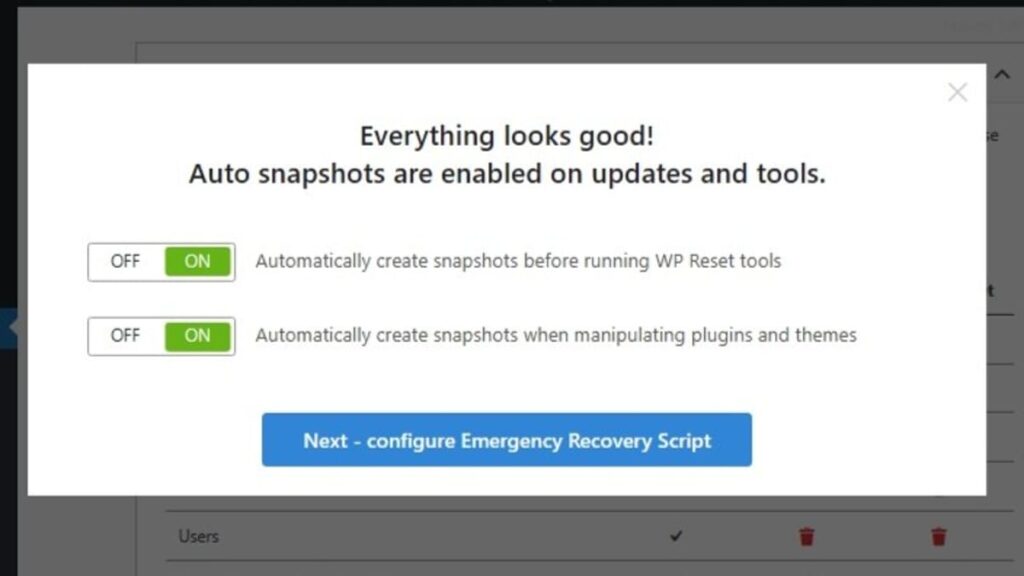
- Activate and run the onboarding process and allow these prompted tasks to occur:
- <Next – Configure Emergency Recovery Script>.
- <Yes, install the script on the server now.
- Then, copy its password and recovery script URL.
- If later forgotten, recovery info is located on tab “Support”.
- Under the tab “Reset”, scroll down to bottom section named “Nuclear Site Reset”. Leave option selected to reactivate “WP Reset” plugin. Then, if you’re certain you have a full site backup, proceed with the Nuclear Site Reset.
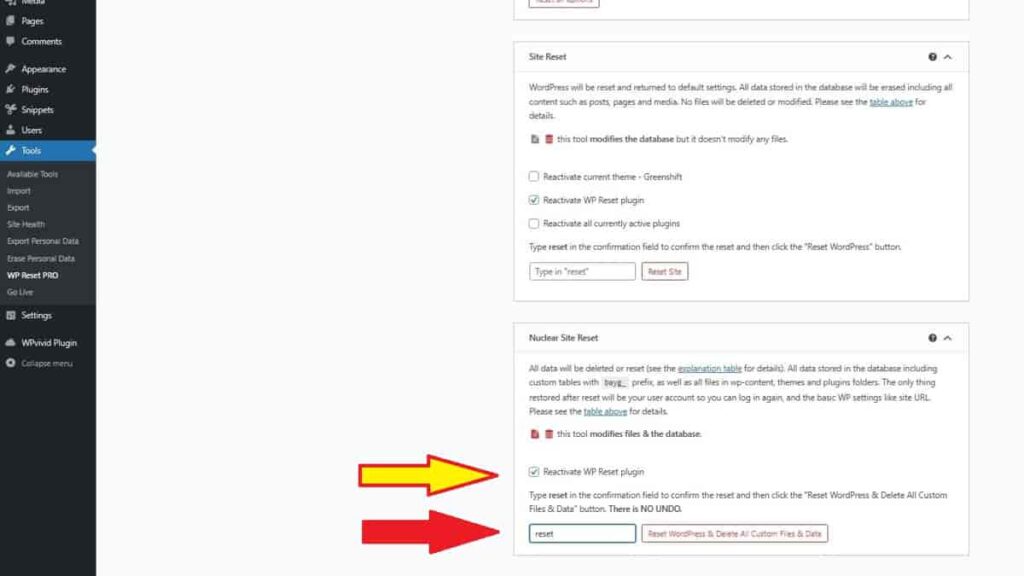
- Notice there’s nothing that will appear for the site homepage URL at this time. It will be blank but there shouldn’t be any errors revealed.
Phase 3. How To Completely Remove the Pro WP Reset Plugin
Removing the Pro WP Reset plugin is, of course, if you want to. However, I often use it during a rebuilding of the WP site for an easier restore to any chosen rebuilding step. So, when I am ready, I follow these steps below to completely and cleanly remove it.
- From WP Admin, go to “Tools | WP Reset PRO”.
- Under tab “Settings”, disable every option and tap <Save Options>.
- Under tab “Support”, tap <Remove emergency recovery script>.
- Under tab “Snapshots”, perform the following tasks.
- Tap <Delete temporary files>.
- Next, scroll down to “User Created Snapshots” section. From there, on the right of the headings, select “Actions” dropdown options to “Delete All User Created Snapshots” Respond to the prompt to confirm deletions.
- Repeat those previous steps in the “Automatic Snapshots” section. Select “Actions” to “Delete All Automatic Snapshots”. Again, respond to the prompt to confirm deletions.
- Deactivate and delete the WP Reset plugin.
- There might be a few minor remaining items to remove, as mentioned during the site rebuild, i.e., if I forgot a step during removing the plugin.
- Finally, via cPanel | File Manager, I go to the folder path “public_html / wp-content” and delete the following folders:
- wp-reset-autosnapshots
- wp-reset-snapshots-export
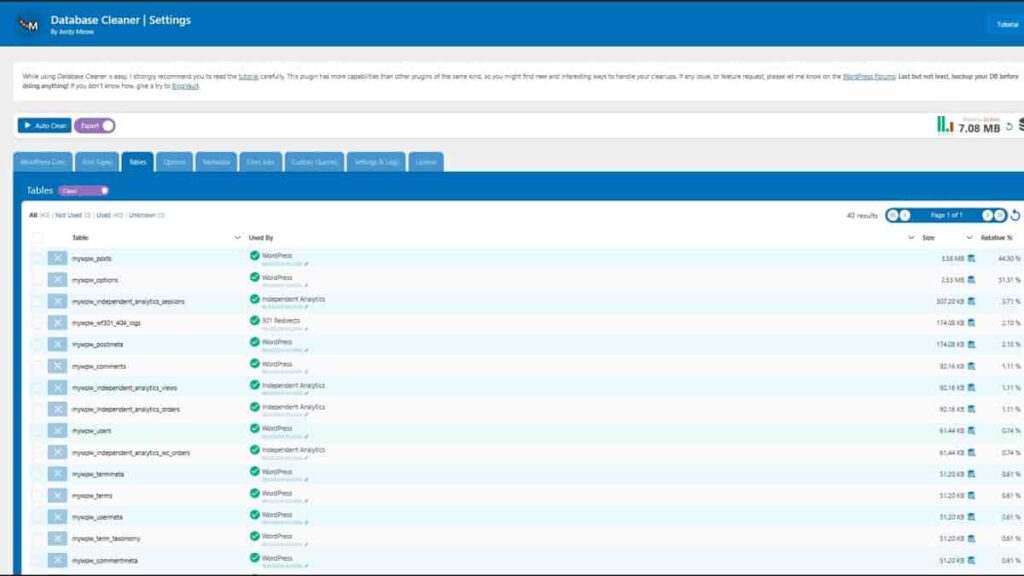
- Sometimes, I just delete them via “Database Cleaner” plugin later after that’s reinstalled.
- An alternate option is to remove them via phpMyAdmin (in cPanel) directly from the database. You must be familiar with the phpMyAdmin usage.
- Finally, via cPanel | File Manager, I go to the folder path “public_html / wp-content” and delete the following folders:
Setup or Rebuilding a WP Website
Here are some posts on the detailed steps I use to rebuild or setup my WordPress sites, following a site reset or creating a new one.
- Rebuild WordPress Website
- How Many Pages Should a Website Have?
- Header and Footer Locations of Navigation Pages
Conclusion of How I Reset a WordPress Site
Now you understand how I reset a WordPress site. Most of my time is spent on backing up the plugins’ settings and taking notes for those that don’t have save features. You’ve also learned that there are theme and SEO settings and exported data to save. Then, you read about backing up the media and content itself. Finally, you saw how easy it was to use the WP Reset plugin to perform the nuclear option to reset WordPress to default status. Optionally, you finished by seeing how to fully and cleanly delete the WP Reset plugin.
